|
本篇文章主要描述了如何使用Atmel ICE编程SAMD21微控制器,在Mac OS X或Linux Debian系统上使用命令行,无需Atmel Studio或任何其他IDE,甚至任何硬件抽象库。
为了说明对SAMD21编程的方式,我们将使用Sparkfun SAMD21 dev分线板作为我们的目标。它采用了流行的Atmel SAMD21G18,我们的示例应该在类似平台上进行很少或不进行修改,例如Arduino M0或TAU。
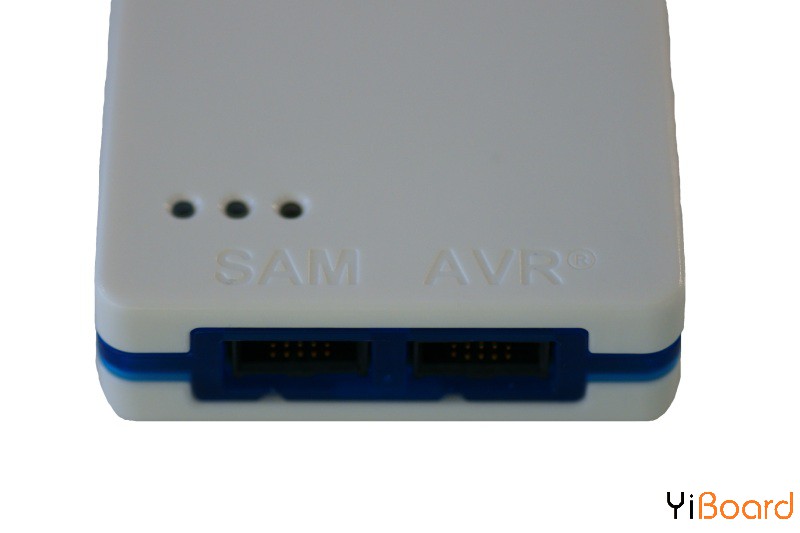
在硬件方面,本文还假设您拥有Atmel ICE Programmer。

您需要安装一些软件包来编程SAMD21开发板。在Debian Linux上,使用您的包管理器(例如'aptitude')。在Mac上,我们建议使用homebrew来安装此处描述的不同工具。
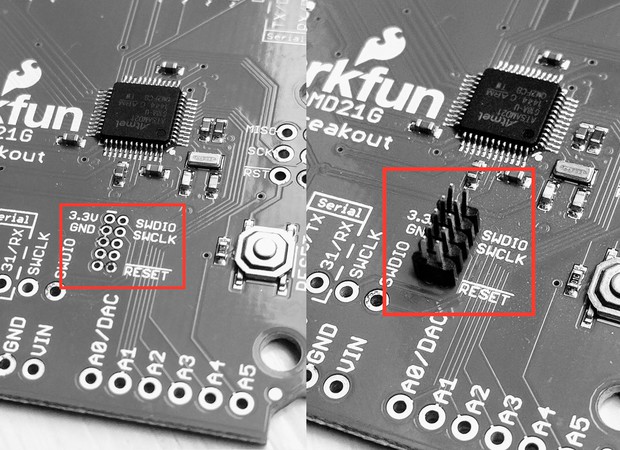
第1步:安装编程插头 要使用OpenOCD对SAMD21板进行编程,您需要使用SWD插头将该编程器连接到您的开发板上。在Sparkfun SAMD21分线板上,此SWD插头存在但未焊接,如下图所示,位于左侧。您需要在右侧安装一个2x5针1.27mm公头,如下图所示。

您不一定需要将插头焊接到电路板上:通常只需插入插头保证电气接触良好即可。然后,您将在Atmel ICE上插入相应的连接器。由于连接器未锁定,因此有两种方式可以将Atmel ICE插入电路板上。如果您尝试一个方向但不起作用,只需翻转连接器即可!
步骤2:为ARM安装C编译器 需要在系统上安装ARM开发人员工具(arm-none-eabi)。
在Mac上,使用homebrew,它归结为一个命令: - $ brew cask install gcc-arm-embedded
在具有Debian风格操作系统的Linux上,您需要引用您的包管理器(apt-get或aptitude)。
第3步:安装OpenOCD 在Mac上安装OpenOCD也是一行代码:
在Debian Linux上,可以使用类似aptitude install openocd的命令就可以了。
安装后,下一步是正确设置OpenOCD。为此,创建一个名为openocf.cfg的文件,其中包含以下内容: - # Atmel-ICE JTAG/SWD in-circuit debugger.
- interface cmsis-dap
- # Chip info
- set CHIPNAME at91samd21g18
- source [find target/at91samdXX.cfg]
您应该更改值91samd21g18以匹配您正在使用的微控制器。
您只需键入openocd即可测试openocd.cfg文件。您应该得到类似于此的输出: - $ openocd
- Open On-Chip Debugger 0.10.0
- Licensed under GNU GPL v2
- For bug reports, read
- http://openocd.org/doc/doxygen/bugs.html
- Info : auto-selecting first available session transport "swd". To override use 'transport select <transport>'.
- none separate
- adapter speed: 400 kHz
- cortex_m reset_config sysresetreq
- Info : CMSIS-DAP: SWD Supported
- Info : CMSIS-DAP: JTAG Supported
- Info : CMSIS-DAP: Interface Initialised (SWD)
- Info : CMSIS-DAP: FW Version = 01.26.0081
- Info : SWCLK/TCK = 1 SWDIO/TMS = 1 TDI = 1 TDO = 1 nTRST = 0 nRESET = 1
- Info : CMSIS-DAP: Interface ready
- Info : clock speed 400 kHz
- in procedure 'init'
- in procedure 'ocd_bouncer'
现在,您可以在要编程的电路板中插入SWD标头。 不要忘记单独为电路板供电,例如USB。 如果再次启动OpenOCD,则应获得以下输出: - $ openocd
- Open On-Chip Debugger 0.10.0
- Licensed under GNU GPL v2
- For bug reports, read
- http://openocd.org/doc/doxygen/bugs.html
- Info : auto-selecting first available session transport "swd". To override use 'transport select <transport>'.
- none separate
- adapter speed: 400 kHz
- cortex_m reset_config sysresetreq
- Info : CMSIS-DAP: SWD Supported
- Info : CMSIS-DAP: JTAG Supported
- Info : CMSIS-DAP: Interface Initialised (SWD)
- Info : CMSIS-DAP: FW Version = 01.26.0081
- Info : SWCLK/TCK = 1 SWDIO/TMS = 1 TDI = 1 TDO = 1 nTRST = 0 nRESET = 1
- Info : CMSIS-DAP: Interface ready
- Info : clock speed 400 kHz
- Info : SWD DPIDR 0x0bc11477
- Info : at91samd21g18.cpu: hardware has 4 breakpoints, 2 watchpoints
如果失败,您可以反向插入SWD连接器:只需将其翻转即可。
现在,当OpenOCD仍在运行时,我们可以通过在另一个终端窗口中键入arm-none-eabi-gdb -iex“target extended-remote localhost:3333”来测试gdb的工作原理: - $ arm-none-eabi-gdb -iex "target extended-remote localhost:3333"
- GNU gdb (GNU Tools for ARM Embedded Processors) 7.10.1.20151217-cvs
- Copyright (C) 2015 Free Software Foundation, Inc.
- License GPLv3+: GNU GPL version 3 or later <http://gnu.org/licenses/gpl.html>
- This is free software: you are free to change and redistribute it.
- There is NO WARRANTY, to the extent permitted by law. Type "show copying"
- and "show warranty" for details.
- This GDB was configured as "--host=x86_64-apple-darwin10 --target=arm-none-eabi".
- Type "show configuration" for configuration details.
- For bug reporting instructions, please see:
- <http://www.gnu.org/software/gdb/bugs/>.
- Find the GDB manual and other documentation resources online at:
- <http://www.gnu.org/software/gdb/documentation/>.
- For help, type "help".
- Type "apropos word" to search for commands related to "word".
- Remote debugging using localhost:3333
- 0x00000168 in ?? ()
- (gdb)
如果你运行到此,OpenOCD已经完成了。
第4步:编写代码使LED闪烁 Sparkfun SAMD21分线板的引脚上标有“D13”的LED,它映射到GPIO PA17:端口A上的第17个io端口。我们将使其闪烁以测试我们的设置。 如果您有另一块电路板,它可能在不同的PIN上有LED或根本没有,您需要调整下面的代码(例如,SAMD21 Xplained pro在PB30上有一个LED)。 - /*
- * main.c
- */
- #include <samd21.h>
- static void delay(int n)
- {
- int i;
- for (;n >0; n--)
- {
- for (i=0;i<100;i++)
- __asm("nop");
- }
- }
- int main(void)
- {
- REG_PORT_DIR0 |= (1<<17);
- while (1)
- {
- REG_PORT_OUT0 &= ~(1<<17);
- delay(500);
- REG_PORT_OUT0 |= (1<<17);
- delay(500);
- }
- }
在上面的代码中,通过设置和清除名为REG_PORT_DIR0的特定寄存器的第17位来实现LED PA17的闪烁,该寄存器对应于SAMD21上的端口A.实际上有几种方法可以在SAMD21上实现相同的结果,我们只是为了简单起见而展示了一个。
要编译此文件,您需要Microchip / Atmel提供的一组标头。首先,从http://www.microchip.com/avr-support/advanced-software-framework-(asf)下载Atmel软件框架(ASF)。实际上,您只会使用这个大框架的一小部分,如果以后需要,您将能够删除该框架的大部分内容。
解压缩文件时,根据您下载的版本,您将获得名为xdk-asf-3.37 /的类似目录。让我们将ASF_ROOT命名为与该目录对应的绝对路径(例如,设置ASF_ROOT =“/ Users / pannetra / Src / xdk-asf-3.37”)。
转到放置openocd.cfg文件的目录并执行以下操作: - $ cp $ASF_ROOT/sam0/utils/cmsis/samd21/source/gcc/startup_samd21.c .
现在,根据您拥有的微控制器,以下步骤需要进行小型定制。对于我们的Sparkfun板,它是SAMD21G18A: - $ cp $ASF_ROOT/sam0/utils/linker_scripts/samd21/gcc/samd21g18a_flash.ld .
如果您有一个与SAMD21G18A不同的微控制器,则应更改文件名samd21g18a_flash.ld以匹配您的微控制器。 - LDSCRIPT = samd21g18a_flash.ld
- PTYPE=__SAMD21G18A__
- CC=arm-none-eabi-gcc
- LD=arm-none-eabi-gcc
- AR=arm-none-eabi-ar
- AS=arm-none-eabi-as
- ELF=$(notdir $(CURDIR)).elf
- ASF_ROOT=../../Src/xdk-asf-3.37
- INCLUDES= \
- sam0/utils/cmsis/samd21/include \
- sam0/utils/cmsis/samd21/source \
- thirdparty/CMSIS/Include \
- thirdparty/CMSIS/Lib/GCC
- OBJS = startup_samd21.o main.o
- LDFLAGS+= -T$(LDSCRIPT) -mthumb -mcpu=cortex-m0 -Wl,--gc-sections
- CFLAGS+= -mcpu=cortex-m0 -mthumb -g
- CFLAGS+= $(INCLUDES:%=-I $(ASF_ROOT)/%) -I .
- CFLAGS+= -D$(PTYPE)
- CFLAGS+=-pipe -Wall -Wstrict-prototypes -Wmissing-prototypes -Werror-implicit-function-declaration \
- -Wpointer-arith -std=gnu99 -fno-strict-aliasing -ffunction-sections -fdata-sections \
- -Wchar-subscripts -Wcomment -Wformat=2 -Wimplicit-int -Wmain -Wparentheses -Wsequence-point \
- -Wreturn-type -Wswitch -Wtrigraphs -Wunused -Wuninitialized -Wunknown-pragmas -Wfloat-equal \
- -Wundef -Wshadow -Wbad-function-cast -Wwrite-strings -Wsign-compare -Waggregate-return \
- -Wmissing-declarations -Wformat -Wmissing-format-attribute -Wno-deprecated-declarations \
- -Wpacked -Wredundant-decls -Wnested-externs -Wlong-long -Wunreachable-code -Wcast-align \
- --param max-inline-insns-single=500
- $(ELF): $(OBJS)
- $(LD) $(LDFLAGS) -o $@ $(OBJS) $(LDLIBS)
- # compile and generate dependency info
- %.o: %.c
- $(CC) -c $(CFLAGS) [ DISCUZ_CODE_1035 ]lt; -o $@
- $(CC) -MM $(CFLAGS) [ DISCUZ_CODE_1035 ]lt; > $*.d
- %.o: %.s
- $(AS) [ DISCUZ_CODE_1035 ]lt; -o $@
- info:
- @echo CFLAGS=$(CFLAGS)
- @echo OBJS=$(OBJS)
- clean:
- rm -f $(OBJS) $(OBJS:.o=.d) $(ELF) $(CLEANOTHER)
- debug: $(ELF)
- arm-none-eabi-gdb -iex "target extended-remote localhost:3333" $(ELF)
- -include $(OBJS:.o=.d)
上面的Makefile源于Geoffrey Brown在STM32上的伟大工作。
如果您有一个与SAMD21G18A不同的微控制器,则需要在Makefile中更改以下两行:LDSCRIPT = samd21g18a_flash.ld和PTYPE = __ SAMD21G18A__,用您自己的samd21g18a替换对samd21g18a的引用。
第5步:编译并运行代码 如果您按照上述所有步骤操作,则应在当前目录中包含以下文件: ● Makefile文件 ● openocd.cfg ● startup_samd21.c ● main.c ● samd21g18a_flash.ld
我们将检查代码是否按预期编译。
现在,您已准备好运行该程序。 连接Atmel ICE并为您的电路板供电。 如前所示启动OpenOCD。 在单独的终端窗口中,我们将使用gdb加载程序并运行它: - $ make debug
- arm-none-eabi-gdb -iex "target extended-remote localhost:3333" OPENOCD_TEST.elf
- GNU gdb (GNU Tools for ARM Embedded Processors) 7.10.1.20151217-cvs
- Copyright (C) 2015 Free Software Foundation, Inc.
- License GPLv3+: GNU GPL version 3 or later <http://gnu.org/licenses/gpl.html>
- This is free software: you are free to change and redistribute it.
- There is NO WARRANTY, to the extent permitted by law. Type "show copying"
- and "show warranty" for details.
- This GDB was configured as "--host=x86_64-apple-darwin10 --target=arm-none-eabi".
- Type "show configuration" for configuration details.
- For bug reporting instructions, please see:
- <http://www.gnu.org/software/gdb/bugs/>.
- Find the GDB manual and other documentation resources online at:
- <http://www.gnu.org/software/gdb/documentation/>.
- For help, type "help".
- Type "apropos word" to search for commands related to "word"...
- Remote debugging using localhost:3333
- 0x00000168 in ?? ()
- Reading symbols from OPENOCD_TEST.elf...done.
- (gdb) load
- Loading section .text, size 0x488 lma 0x0
- Loading section .relocate, size 0x428 lma 0x488
- Start address 0x0, load size 2224
- Transfer rate: 2 KB/sec, 1112 bytes/write.
- (gdb) monitor reset halt
- target halted due to debug-request, current mode: Thread
- xPSR: 0x81000000 pc: 0x00000270 msp: 0x20001418
- (gdb) c
- Continuing.
注意以下的gdb命令: ● load将代码上传到SAMD21 ● monitor reset halt复位SAMD21 ● c开始运行代码(c是contiue的简写)
此时你的LED应该闪烁! |