风筝
发表于: 2022-7-5 18:06:40 | 显示全部楼层

在Arduino项目中添加温度传感的最简单且廉价的方法其中之一是使用TMP36温度传感器。这些传感器相当精确,不需要外部组件即可工作。因此,只需几个连接线和一些Arduino代码,您就可以立即测量温度!


TMP36温度传感器

TMP36是由Analog Devices公司生产的低压、精密摄氏度温度传感器。它是一种提供电压输出的芯片,该电压输出与以°C 为单位的温度成线性比例,因此非常容易与Arduino一起使用。

TMP36-Temperature-Sensor.jpg


TMP36温度传感器相当精确,永不磨损,可在多种环境条件下工作,无需外部组件即可工作。此外,TMP36传感器不需要校准,在+25°C和-40°C至+125°C温度范围内的典型精度为±1°C和±2°C。


该传感器可由2.7V至5.5V电源供电,在主动温度转换期间仅消耗50µA,提供非常低的自发热(在静止空气中低于0.1°C)。此外,还提供关断功能,可将电源电流降至0.5µA 以下。


以下是完整的规格:

电源
2.7V 至 5.5V
电流消耗
50µA
温度范围
-40°C 至 125°C
精度
±2°C
输出比例因子
10mV/°C
输出范围
0.1V (-40°C) 至 1.75V (125°C)
25°C 时输出
750mV

工作原理

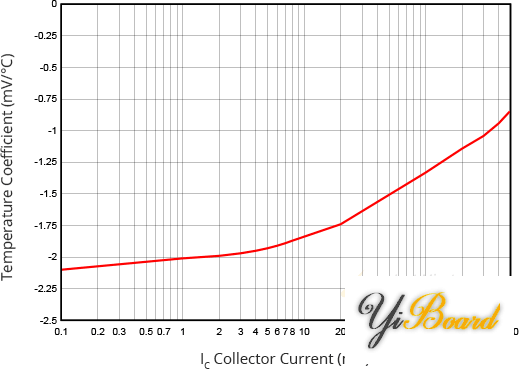
TMP36使用固态技术来测量温度。它利用了这样一个事实,即连接二极管的晶体管的基极和发射极之间的电压降(正向电压 - Vbe)随着温度的升高而以已知的速率降低。通过精确放大这种电压变化,很容易产生与温度成正比的模拟信号。
Relationship-Between-Forward-Voltage-and-Temperature.png


正向电压和温度之间的这种线性关系是为什么使用二极管连接的晶体管作为温度测量器件的原因。本质上,这就是测量温度的方式,尽管多年来这项技术已经有了一些改进。可以在此处找到有关此技术的更多信息。


好消息是所有这些复杂的计算都在TMP36内部完成。它只是输出与温度成线性比例的电压。


如何测量温度

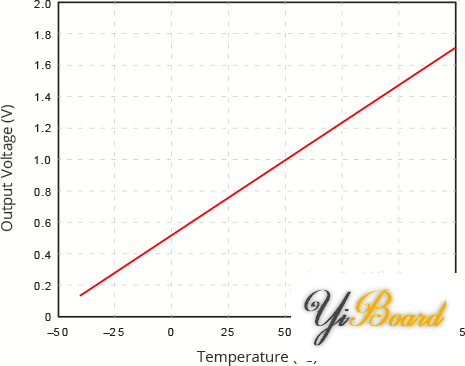
TMP36易于使用,只需将左侧引脚连接到电源 (2.7-5.5V) 并将右侧引脚接地(假设传感器的平面面向您)。然后中间引脚将具有与°C 温度成正比(线性)的模拟电压。这可以在输出电压与温度特性中很容易看出。请注意,模拟输出电压与电源无关。
TMP36-Temperature-Sensor-Output-Relationship-Curve.png


要将电压转换为温度,只需使用基本公式:

温度 (°C) = (Vout – 0.5) * 100


例如,如果电压输出为 1V,则意味着温度为 (1 – 0.5) * 100 = 50 °C


测试TMP36传感器

测试TMP36非常简单,只需将左侧引脚连接到2.7-5.5V电源(两节 AA 电池工作得很好),右侧引脚接地(假设传感器的平面面向您)。现在将直流电压模式下的万用表连接到地和中间引脚。在室温(25°C)下,电压应为0.75V 左右。


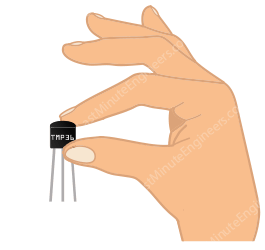
尝试轻轻挤压传感器的塑料外壳以查看温度升高。
Try-squeezing-TMP36-to-see-rise-in-temperature.png


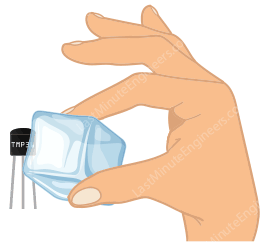
或者尝试用冰块(装在塑料袋中,以免电路与水接触)触摸传感器,然后观察温度下降。
Try-touching-TMP36-with-ice-to-watch-temperature-drop.png


TMP36传感器引脚排列

TMP36具有三种不同的外形尺寸,但最常见的类型是3引脚TO-92封装,它看起来就像一个晶体管。让我们来看看它的引脚排列。
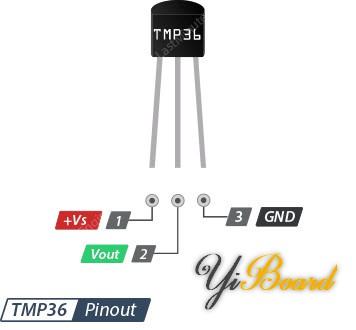
TMP36-Temperature-Sensor-Pinout.jpg


+Vs 是传感器的电源,可以在2.7V到5.5V。

Vout 引脚产生与温度成正比(线性)的模拟电压。它应该连接到模拟 (ADC) 输入。

GND 是接地引脚。


将TMP36温度传感器连接到Arduino

将TMP36连接到Arduino非常简单。您只需要连接三个引脚:两个用于电源,一个用于读取传感器值。


传感器可由3.3或5V输出供电。正电压连接到“+Vs”,地连接到“GND”。中间引脚“Vout”是传感器的模拟信号输出,连接到Arduino的A0模拟输入。


以下是TMP36的连接:
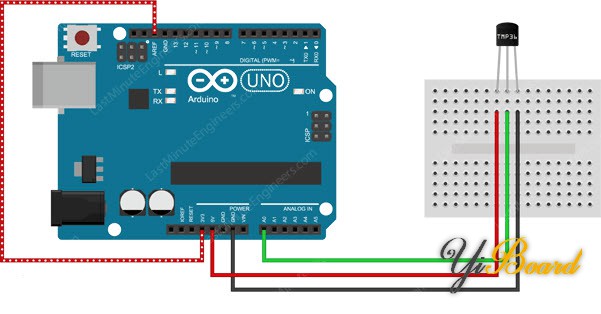
Arduino-Wiring-for-Improving-Accuracy-of-TMP36-Sensor.jpg


要测量空气温度,请将传感器放在露天或将其连接到要测量温度的物体上,例如水槽。


读取模拟温度数据

正如您在上面的接线图中所见,TMP36的输出连接到其中一个Arduino的模拟输入。该模拟输入的值可以通过analogRead()函数读取。


但是,analogRead() 函数实际上并不返回传感器的输出电压。相反,它将输入电压在0和ADC参考电压之间映射到从0 到1023的整数值。将此值转换回传感器的输出电压,使用这个公式:

Vout = (从 ADC 读取) * (5 / 1024)


此公式将ADC中的数字0-1023转换为0-5V


如果你使用的是3.3V Arduino,你会想要使用这个:

Vout = (从 ADC 读取) * (3.3 / 1024)


此公式将ADC中的数字0-1023转换为0-3.3V


然后,要将电压转换为温度,请使用以下公式:

温度 (°C) = (Vout – 0.5) * 100

跳转到指定楼层
风筝
发表于: 2022-7-6 09:14:02 | 显示全部楼层

Arduino代码 - 简易温度计

下面的草图显示了一种快速读取TMP36温度传感器的方法,可以作为更多实际实验和项目的基础。 它只是使用模拟端口A0从TMP36读取值,然后在串口监视器上打印当前温度(以°C 和°F 为单位)。 将该草图上传到Arduino开发板。

  1. // Define the analog pin, the TMP36's Vout pin is connected to
  2. #define sensorPin A0

  3. void setup() {
  4.   // Begin serial communication at 9600 baud rate
  5.   Serial.begin(9600);
  6. }

  7. void loop() {
  8.   // Get the voltage reading from the TMP36
  9.   int reading = analogRead(sensorPin);

  10.   // Convert that reading into voltage
  11.   // Replace 5.0 with 3.3, if you are using a 3.3V Arduino
  12.   float voltage = reading * (5.0 / 1024.0);

  13.   // Convert the voltage into the temperature in Celsius
  14.   float temperatureC = (voltage - 0.5) * 100;

  15.   // Print the temperature in Celsius
  16.   Serial.print("Temperature: ");
  17.   Serial.print(temperatureC);
  18.   Serial.print("\xC2\xB0"); // shows degree symbol
  19.   Serial.print("C  |  ");
  20.   
  21.   // Print the temperature in Fahrenheit
  22.   float temperatureF = (temperatureC * 9.0 / 5.0) + 32.0;
  23.   Serial.print(temperatureF);
  24.   Serial.print("\xC2\xB0"); // shows degree symbol
  25.   Serial.println("F");

  26.   delay(1000); // wait a second between readings
  27. }
复制代码

运行后,您可以在串口监视器中看到以下输出。

TMP36-Arduino-Output.jpg


代码说明

草图首先定义传感器的Vout引脚连接到的Arduino引脚。

  1. #define sensorPin A0
复制代码

setup()函数中,我们初始化与计算机的串口连接。

  1. void setup() {
  2.   Serial.begin(9600);
  3. }
复制代码

loop()函数中,我们首先使用analogRead() 函数从TMP36读取模拟信号。

  1. int reading = analogRead(sensorPin);
复制代码

然后使用本文前面讨论的公式将模拟读数转换为电压,然后转换为温度。

  1. float voltage = reading * (5.0 / 1024.0);

  2. float temperatureC = (voltage - 0.5) * 100;
复制代码

接下来,将结果打印在串口监视器上。

  1. Serial.print("Temperature: ");
  2. Serial.print(temperatureC);
  3. Serial.print("\xC2\xB0"); // shows degree symbol
  4. Serial.print("C  |  ");
复制代码

我们得到的温度值以摄氏度 (°C) 为单位。使用简单的公式将其转换为华氏 (°F) 并打印在串口监视器上。

  1. float temperatureF = (temperatureC * 9.0 / 5.0) + 32.0;
  2. Serial.print(temperatureF);
  3. Serial.print("\xC2\xB0"); // shows degree symbol
  4. Serial.println("F");
复制代码

提高TMP36传感器的精度

因为我们没有配置用于模拟输入的参考电压 (ARef),所以我们从ADC获得的最大分辨率为5/1024 = 4.88 mV 或 0.49°C。


为获得更好的结果,使用3.3v参考电压作为ARef而不是5V,会更精确且噪音更小。以3.3V作为参考电压,我们得到3.3/1024 = 3.22 mV 或0.32°C的分辨率。


要将3.3v引脚用作模拟参考,请将其连接到AREF(模拟参考)输入,如下所示。

Arduino-Wiring-for-Improving-Accuracy-of-TMP36-Sensor.jpg


您还需要对代码进行一些更改。我在下面的代码中突出显示了您需要添加/更改的行:

  1. // Define the analog pin, the TMP36's Vout pin is connected to
  2. #define sensorPin A0

  3. // Tie ARef to 3.3V
  4. #define aref_voltage 3.3

  5. void setup() {
  6.   // Begin serial communication at 9600 baud rate
  7.   Serial.begin(9600);

  8.   // If you want to set the aref to something other than 5v
  9.   analogReference(EXTERNAL);
  10. }

  11. void loop() {
  12.   // Get the voltage reading from the TMP36
  13.   int reading = analogRead(sensorPin);

  14.   // Convert that reading into voltage
  15.   float voltage = reading * (aref_voltage / 1024.0);

  16.   // Convert the voltage into the temperature in Celsius
  17.   float temperatureC = (voltage - 0.5) * 100;

  18.   // Print the temperature in Celsius
  19.   Serial.print("Temperature: ");
  20.   Serial.print(temperatureC);
  21.   Serial.print("\xC2\xB0"); // shows degree symbol
  22.   Serial.print("C  |  ");
  23.   
  24.   // Print the temperature in Fahrenheit
  25.   float temperatureF = (temperatureC * 9.0 / 5.0) + 32.0;
  26.   Serial.print(temperatureF);
  27.   Serial.print("\xC2\xB0"); // shows degree symbol
  28.   Serial.println("F");

  29.   delay(1000); // wait a second between readings
  30. }
复制代码

您可以在串口监视器中看到以下输出。

TMP36-Arduino-Improved-Accuracy-Output.jpg


你可以看到准确率可以提高一点,但是对于大多数项目来说,这还不够。


TMP36的替代方案是使用数字温度传感器,例如DS18B20,它采用相同的封装。 数字温度传感器具有更好的抗噪性,这在传感器放置在远处或电噪声环境中时很有用。

回复

使用道具 举报

风筝
发表于: 2022-7-6 09:22:53 | 显示全部楼层

Arduino项目 – 使用TMP36和I2C LCD的温度计

有时您会想出一个想法,希望在哪里实时显示温度读数,并在温度超出指定范围时显示报警。那么你可能需要一个1602字符LCD而不是串口监视器。


在此示例中,我们将I2C LCD与TMP36一起连接到Arduino开发板。


如下接线图所示,连接I2C LCD非常简单。下图向您展示了如何连接所有组件。

Wiring-TMP36-Temperature-Sensor-to-Arduino-and-I2C-LCD.jpg


以下草图将在1602字符I2C LCD上打印温度值。代码与第一个示例类似,不同之处在于值打印在I2C LCD上。

  1. // Include the LiquidCrystal_I2C library
  2. #include <LiquidCrystal_I2C.h>

  3. // Create a new instance of the LiquidCrystal_I2C class
  4. LiquidCrystal_I2C lcd(0x3F, 16, 2);

  5. // Define a custom degree character
  6. byte Degree[] = {
  7.   B00111,
  8.   B00101,
  9.   B00111,
  10.   B00000,
  11.   B00000,
  12.   B00000,
  13.   B00000,
  14.   B00000
  15. };

  16. // Define the analog pin, the TMP36's Vout pin is connected to
  17. #define sensorPin A0

  18. void setup() {
  19.   // Start the LCD and turn on the backlight
  20.   lcd.init();
  21.   lcd.backlight();

  22.   // Create a custom character
  23.   lcd.createChar(0, Degree);
  24. }

  25. void loop() {
  26.   // Get the voltage reading from the TMP36
  27.   int reading = analogRead(sensorPin);

  28.   // Convert that reading into voltage
  29.   // Replace 5.0 with 3.3, if you are using a 3.3V Arduino
  30.   float voltage = reading * (5.0 / 1024.0);

  31.   // Convert the voltage into the temperature in Celsius
  32.   float temperatureC = (voltage - 0.5) * 100;

  33.   // Print the temperature on the LCD;
  34.   lcd.setCursor(0, 0);
  35.   lcd.print("Temperature:");
  36.   lcd.setCursor(0, 1);
  37.   lcd.print(temperatureC, 1);
  38.   lcd.write(0); // print the custom degree character
  39.   lcd.print("C ");
  40.   
  41.   // Print the temperature in Fahrenheit
  42.   float temperatureF = (temperatureC * 9.0 / 5.0) + 32.0;
  43.   lcd.print(temperatureF, 1);
  44.   lcd.write(0); // print the custom degree character
  45.   lcd.print("F ");

  46.   delay(1000); // wait a second between readings
  47. }
复制代码

您可以在LCD上看到以下输出:

TMP36-Sensor-Output-On-I2C-LCD.jpg


回复

使用道具 举报

您需要登录后才可以回帖 登录 | 立即注册

本版积分规则

主题 714 | 回复: 1501


手机版|

GMT+8, 2024-12-22 01:22 , Processed in 0.048825 second(s), 6 queries , Gzip On, MemCache On. Powered by Discuz! X3.5

YiBoard一板网 © 2015-2022 地址:河北省石家庄市长安区高营大街 ( 冀ICP备18020117号 )

快速回复 返回顶部 返回列表