|
如今,由于物联网系统的使用越来越多,了解物联网设备的运行和实施是非常重要的。在本篇文章中,我们将使用Arduino制作指纹考勤设备,除了将日志信息和工作时间存储在存储卡上之外,一旦连接到Internet,就将这些信息上传到Thingspeak平台上。您可以从面板以各种格式(如CSV)下载此信息。
什么是Thingspeak? Iot(物联网)是一个平台,其中有许多东西连接到互联网,与个人和其他设备交互,并且通常将数据上传到云计算以进行分析。
Thingspeak是一个物联网平台,可让您在云计算中显示和收集实时数据。

与Thingspeak连接并上传数据 按照以下步骤启动Thingspeak连接: 步骤1)进入Thingspeak.com网站,然后创建一个帐户。

步骤2)激活帐户后登录,然后单击“My Channel”部分中的“New Channel”。

步骤3)在打开的新窗口中,在面板写一个名称,如果有必要,写下描述。通过分配名称来确定所需的字段数。其余部分是可选的。完成信息后保存面板。
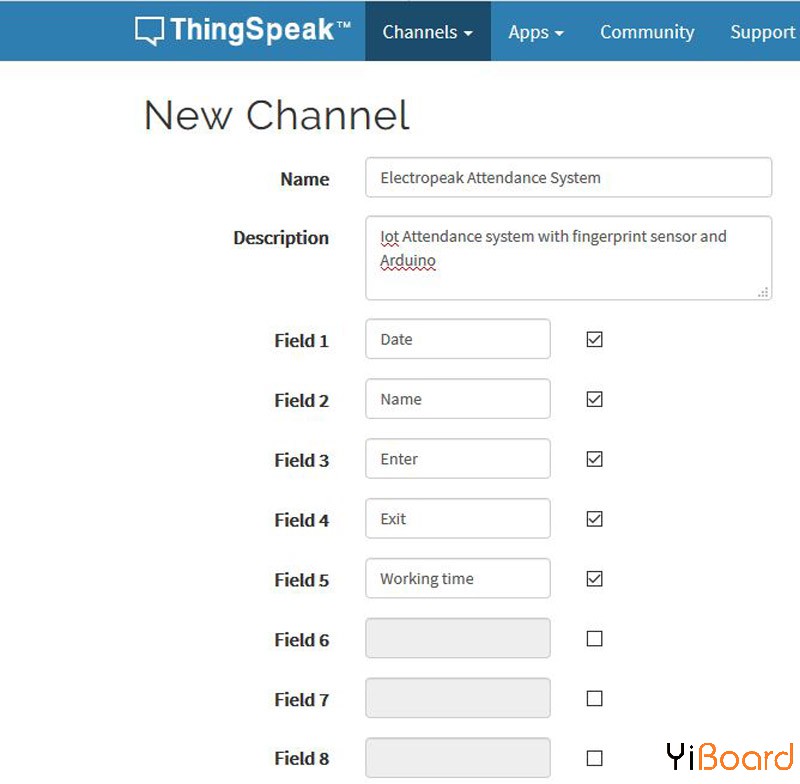
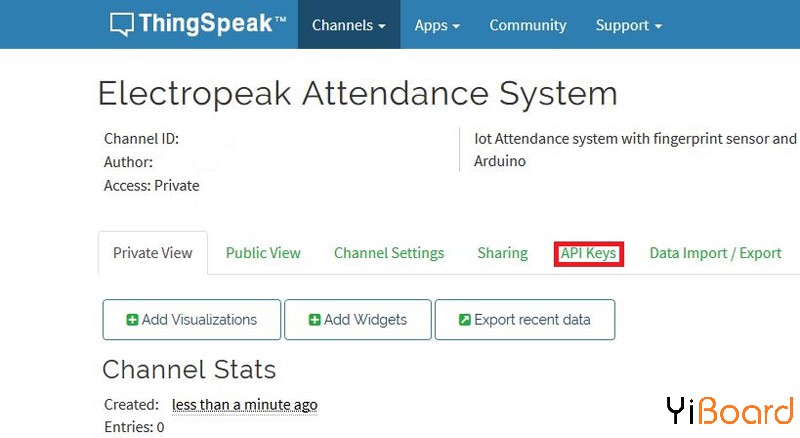
步骤4)现在转到面板中的API Keys。
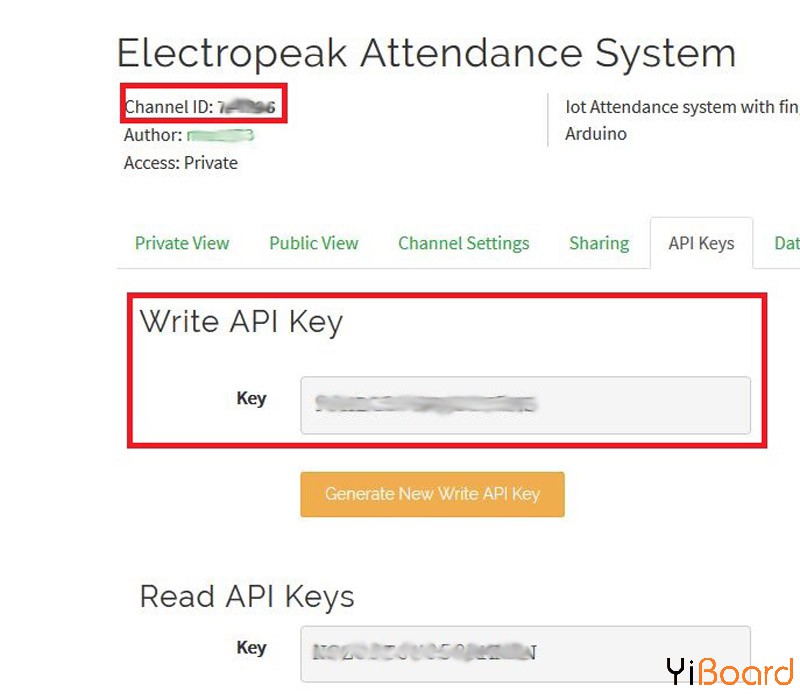
步骤5)您需要Channel ID和Write API Key来传输数据,因此请将其写下来。
步骤6)下载Thingspeak库并将其添加到Arduino IDE。Thingspeak库
步骤7)转到Arduino IDE。从示例部分打开WriteMultipleFiels,然后输入SSID、Password、Channel ID和Write API Key值。 - /*
- WriteMultipleFields
-
- Description: Writes values to fields 1,2,3,4 and status in a single Thingspeak update every 20 seconds.
-
- Hardware: ESP8266 based boards
-
- !!! IMPORTANT - Modify the secrets.h file for this project with your network connection and Thingspeak channel details. !!!
-
- Note:
- - Requires ESP8266WiFi library and ESP8622 board add-on. See https://github.com/esp8266/Arduino for details.
- - Select the target hardware from the Tools->Board menu
- - This example is written for a network using WPA encryption. For WEP or WPA, change the WiFi.begin() call accordingly.
-
- Thingspeak ( https://www.Thingspeak.com ) is an analytic IoT platform service that allows you to aggregate, visualize, and
- analyze live data streams in the cloud. Visit https://www.Thingspeak.com to sign up for a free account and create a channel.
-
- Documentation for the Thingspeak Communication Library for Arduino is in the README.md folder where the library was installed.
- See https://www.mathworks.com/help/Thingspeak/index.html for the full Thingspeak documentation.
-
- For licensing information, see the accompanying license file.
-
- Copyright 2018, The MathWorks, Inc.
- */
- #include "Thingspeak.h"
- #include "secrets.h"
- #include <ESP8266WiFi.h>
- char ssid[] = SECRET_SSID; // your network SSID (name)
- char pass[] = SECRET_PASS; // your network password
- int keyIndex = 0; // your network key Index number (needed only for WEP)
- WiFiClient client;
- unsigned long myChannelNumber = SECRET_CH_ID;
- const char * myWriteAPIKey = SECRET_WRITE_APIKEY;
- // Initialize our values
- int number1 = 0;
- int number2 = random(0,100);
- int number3 = random(0,100);
- int number4 = random(0,100);
- String myStatus = "";
- void setup() {
- Serial.begin(115200); // Initialize serial
- WiFi.mode(WIFI_STA);
- Thingspeak.begin(client); // Initialize Thingspeak
- }
- void loop() {
- // Connect or reconnect to WiFi
- if(WiFi.status() != WL_CONNECTED){
- Serial.print("Attempting to connect to SSID: ");
- Serial.println(SECRET_SSID);
- while(WiFi.status() != WL_CONNECTED){
- WiFi.begin(ssid, pass); // Connect to WPA/WPA2 network. Change this line if using open or WEP network
- Serial.print(".");
- delay(5000);
- }
- Serial.println("\nConnected.");
- }
- // set the fields with the values
- Thingspeak.setField(1, number1);
- Thingspeak.setField(2, number2);
- Thingspeak.setField(3, number3);
- Thingspeak.setField(4, number4);
- // figure out the status message
- if(number1 > number2){
- myStatus = String("field1 is greater than field2");
- }
- else if(number1 < number2){
- myStatus = String("field1 is less than field2");
- }
- else{
- myStatus = String("field1 equals field2");
- }
-
- // set the status
- Thingspeak.setStatus(myStatus);
-
- // write to the Thingspeak channel
- int x = Thingspeak.writeFields(myChannelNumber, myWriteAPIKey);
- if(x == 200){
- Serial.println("Channel update successful.");
- }
- else{
- Serial.println("Problem updating channel. HTTP error code " + String(x));
- }
-
- // change the values
- number1++;
- if(number1 > 99){
- number1 = 0;
- }
- number2 = random(0,100);
- number3 = random(0,100);
- number4 = random(0,100);
-
- delay(20000); // Wait 20 seconds to update the channel again
- }
上传代码后,您将看到在面板的第1到4栏中上传的一些随机数字。在考勤系统中使用相同的结构代码来上载数据。
注意:每次在Thingspeak面板上上传数据之间至少等待15秒。
所需的材料 ● Arduino Mega 2560 R3开发板 ● R301T指纹传感器 ● Micro SD TF卡适配器模块 ● DS3231 I2C RTC模块 ● 3.5“TFT彩色显示屏模块 ● NodeMCU ESP8266 ESP-12E模块 ● 公对母跳线 ● Arduino IDE
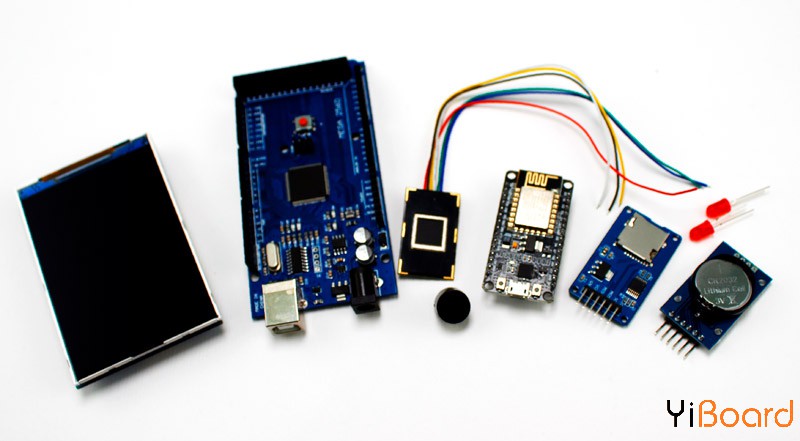
使用指纹传感器和Arduino创建考勤系统 在该系统中,通过指纹登记到达和离开后,他的日期、姓名、到达时间、出发时间和工作时间等信息将存储在SD卡上。然后,此信息将在您指定的时间发送到Thingspeak。在没有Internet连接的情况下,未分发的数据将被存储,并在连接到Internet后立即转发到Thingspeak。由于信息存储在微控制器的EEPROM中,因此在断电时不会丢失。
电路连接
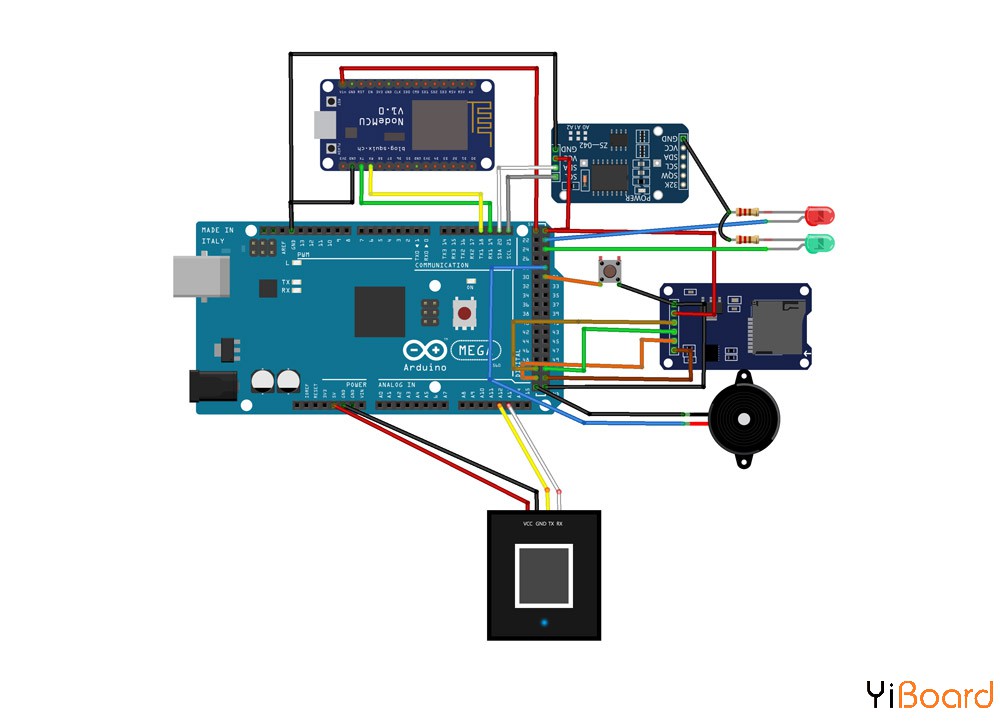
连接好所有模块后,将LCD扩展板插到Arduino开发板上。
代码 本文使用的代码需要以下库: ● Adafruit-Fingerprint-Sensor-Library ● Adafruit-GFX-Library ● MCUFRIEND_kbv ● RTClib
现在下载以下代码并将其上传到Arduino。此代码是为使用默认姓名的11人编写的,但您可以更改它们并将其从默认模式中删除。要注册新名称,只需将设备连接到计算机,然后按键进入注册模式,然后打开串行监视器并按照串行监视器上显示的注册过程进行操作。
从这里下载代码:
 Electropeak_Attendance_Code.zip
(10.04 KB, 下载次数: 10)
Nodemcu执行在该系统中上传信息的任务。它从Arduino通过串口获取上传信息,并返回上传到Arduino的状态。在Nodemcu上上传以下代码。 - #include "Thingspeak.h"
- #include ESP8266WiFi.h>
- char ssid[] = "YOUR SSID";
- char pass[] = "SSID PASSWORD";
- WiFiClient client;
- unsigned long myChannelNumber = YOUR CHANNEL ID;
- const char * myWriteAPIKey = "YOUR CHANNEL WRITE API KEY";
- String Final = "";
- String Date = "";
- String Enter = "";
- String Exit = "";
- String Name = "";
- String WT = "";
- void String_Analyze(String input) {
- int index1, index2, index3, index4;
- index1 = input.indexOf('*', 0);
- index2 = input.indexOf('*', index1 + 1);
- index3 = input.indexOf('*', index2 + 1);
- index4 = input.lastIndexOf('*');
- Name = input;
- Date = input;
- Enter = input;
- Exit = input;
- WT = input;
- Name.remove(index1);
- Date.remove(index2);
- Date.remove(0, index1 + 1);
- Enter.remove(index3);
- Enter.remove(0, index2 + 1);
- Exit.remove(index4);
- Exit.remove(0, index3 + 1);
- WT.remove(0, index4 + 1);
- }
- void Get_String()
- {
- while (Serial.available()) {
- Final = Serial.readString(); // read the incoming data as string
- //Serial.println(Final);
- }
- }
- void setup() {
- Serial.begin(9600);
- WiFi.mode(WIFI_STA);
- Thingspeak.begin(client);
- pinMode(LED_BUILTIN, OUTPUT);
- digitalWrite(LED_BUILTIN, HIGH);
- }
- void loop() {
- if (WiFi.status() != WL_CONNECTED) {
- //Serial.print("Attempting to connect to SSID: ");
- // Serial.println(ssid);
- while (WiFi.status() != WL_CONNECTED) {
- WiFi.begin(ssid, pass); // Connect to WPA/WPA2 network. Change this line if using open or WEP network
- Serial.print("0");
- delay(5000);
- }
- }
- digitalWrite(LED_BUILTIN, LOW);
- //Serial.println("\nConnected.");
- Get_String();
- String_Analyze(Final);
- if (!Final.equals(""))
- {
- Thingspeak.setField(1, Date);
- Thingspeak.setField(2, Name);
- Thingspeak.setField(3, Enter);
- Thingspeak.setField(4, Exit);
- Thingspeak.setField(5, WT);
- int x = Thingspeak.writeFields(myChannelNumber, myWriteAPIKey);
- if (x == 200) {
- delay(100);
- Serial.print("1");
- }
- else {
- delay(100);
- Serial.print("0");
- }
- delay(17000);
- Final = "";
- }
首先,根据您的Thingspeak面板更改Channel ID和Write API Key。
此代码中的String_Analuze();函数将Nodemcu输入字符串分为日期、名称、到达和离开时间以及工作时间,并将此信息发送到Thingspeak。然后,如果上传过程成功,则发送字符“1”,否则它将字符“0”发送给Arduino。
组装考勤设备 您可以使用以下图纸和不同颜色的树脂玻璃或任何其他材料来构建考勤设备的机身。

从这里下载机身激光切割图:
 attendance box laser cut.rar
(39.93 KB, 下载次数: 7)
放置电子元件并组装整个机身后,将其安装在所需位置。现在,只需将12V适配器插入设备即可开始工作。 |  |手机版|YiBoard一板网
( 冀ICP备18020117号 )