|
我们可以将小型步进电机直接连接到Arduino开发板,以便非常精确地控制轴位置。 由于步进电机使用反馈来确定轴的位置,我们可以非常精确地控制该位置。因此,步进电机经常用于控制物体的位置,旋转物体,移动机器人的腿、手臂,精确移动传感器等。步进电机体积小,并且由于它们内置电路控制其自身的运动,因此可以直接连接到Arduino开发板。
大多数步进电机有以下三根连接线:
● 黑色/棕色的地线。 ● 红色电源线(5V)。 ● 黄色或白色PWM线。
在本篇文章中,我们将电源和地引脚直接连接到Arduino开发板的5V和GND引脚。 PWM输入连接到Arduino的一个数字输出引脚。
实验1 在本实验中,Ardunio开发板通过PWM引脚按照给定角度旋转步进电机。
需要的硬件 ● TowerPro SG90步进电机 ● Arduino Mega2560开发板 ● 连接导线
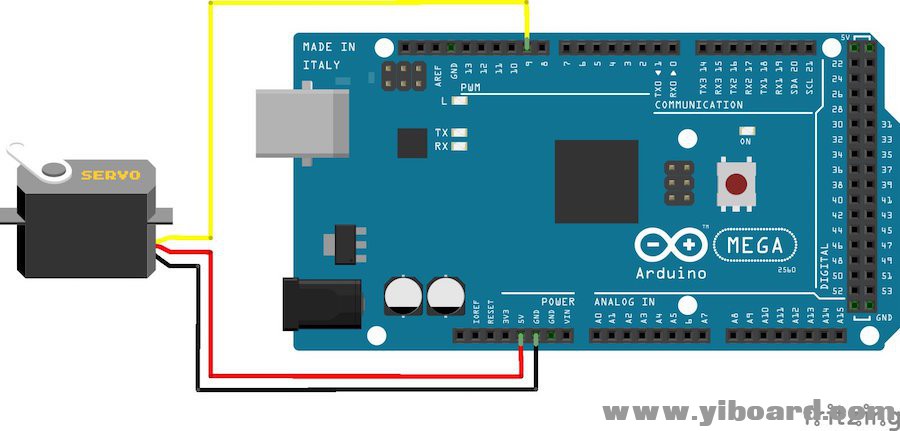
接线图 步进电机的最佳之处在于它可以直接连接到Arduino。下图显示了步进电机与Arduino的连接方法: ● 步进电机的红线 - Arduino的5V引脚 ● 步进电机的棕线 - Arduino的接地引脚 ● 步进电机的黄线 - Arduino的PWM(9)引脚
注意:请勿尝试用手旋转步进电机,否则可能会损坏电机。

代码 程序开始运行时,步进电机将从0度缓慢旋转180度,每次一度。当电机旋转180度时,它将开始向另一个方向旋转,直到它返回原位。 - #include //Servo library
-
- Servo servo_test; //initialize a servo object for the connected servo
-
- int angle = 0;
-
- void setup()
- {
- servo_test.attach(9); // attach the signal pin of servo to pin9 of arduino
- }
-
- void loop()
- {
- for(angle = 0; angle < 180; angle += 1) // command to move from 0 degrees to 180 degrees
- {
- servo_test.write(angle); //command to rotate the servo to the specified angle
- delay(15);
- }
-
- delay(1000);
-
- for(angle = 180; angle>=1; angle-=5) // command to move from 180 degrees to 0 degrees
- {
- servo_test.write(angle); //command to rotate the servo to the specified angle
- delay(5);
- }
- delay(1000);
- }
实验2 该实验与实验1基本相同,只是我们增加了一个位置控制电位器。 Arduino将读取电位器中间引脚上的电压,然后调整步进电机轴的位置。
需要的硬件 ● TowerPro SG90步进电机 ● Arduino Mega2560开发板 ● 20kΩ电位器 ● 面包板 ● 连接导线
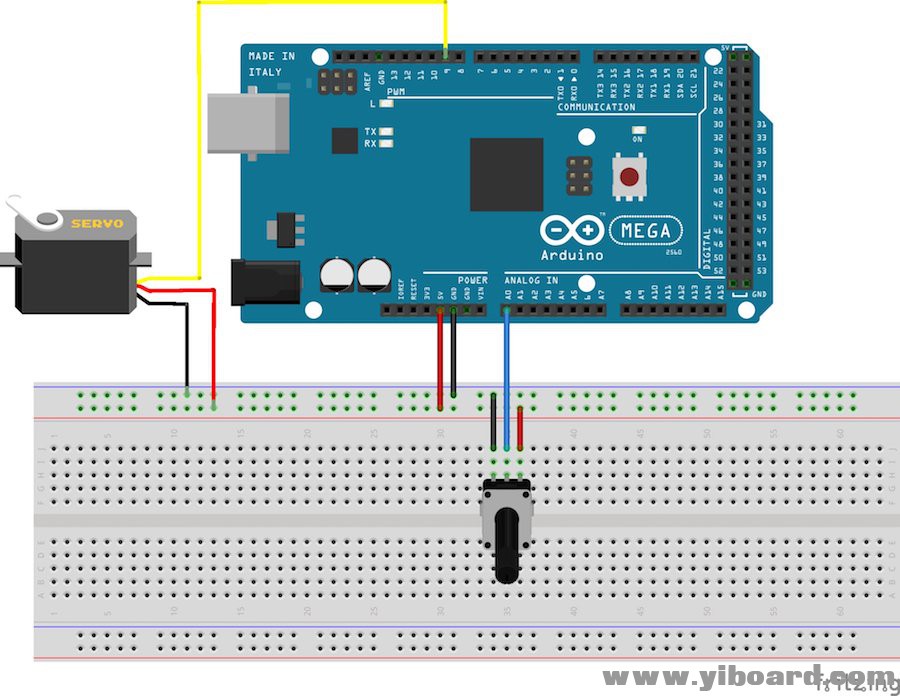
接线图 连接电路如下图所示:
● 步进电机的红线 - Arduino的5V ● 步进电机的棕线 - Arduino的接地引脚
● 步进电机的黄线 - Arduino的PWM(9)引脚 ● 电位器的1脚 - Arduino的5V ● 电位器的3脚 - Arduino的接地引脚 ● 电位器的2脚 - Arduino的模拟输入(A0)引脚

代码
程序启动后,旋转电位器应会使得步进电机的轴旋转。 - #include //Servo library
-
- Servo servo_test; //initialize a servo object for the connected servo
-
- int angle = 0;
- int potentio = A0; // initialize the A0analog pin for potentiometer
-
- void setup()
- {
- servo_test.attach(9); // attach the signal pin of servo to pin9 of arduino
- }
-
- void loop()
- {
- angle = analogRead(potentio); // reading the potentiometer value between 0 and 1023
- angle = map(angle, 0, 1023, 0, 179); // scaling the potentiometer value to angle value for servo between 0 and 180)
- servo_test.write(angle); //command to rotate the servo to the specified angle
- delay(5);
- }
|  |手机版|YiBoard一板网
( 冀ICP备18020117号 )