|
在本本篇文章中,我们将使用DRV8825电机驱动模块和Arduino控制NEMA17步进电机。DRV8825是用于控制双极步进电机的微步进驱动器,该电机具有内置转换器,便于操作。因此,我们可以只用控制器的2个引脚来控制步进电机。DIR引脚控制旋转方向,STEP引脚将控制步数。
在之前的帖子中,我们学习了使用电位器和操纵杆控制步进电机。28BYJ-48是一款5线单极步进电机,运行电压为5伏,不需要任何驱动器。但是NEMA17步进电机需要8V-35V电源,因为扭矩太高。因此我们需要步进驱动模块,如A4988或DRV8825。

所需的组件 ● Arduino Nano开发板 ● 步进电机驱动器DRV8825模块 ● 步进电机NEMA17 ● 电解电容器 ● 12V, 2A DC适配器 ● 5V DC适配器 ● 连接跳线 ● 面包板
DRV8825步进电机驱动模块 DRV8825是一款完整的微步进电机驱动器,具有内置转换器,易于操作。Texas Instruments提供的分线板具有可调节的电流限制、过流和过温保护以及六种不同的微步分辨率。它的工作电压为8.2V至45 V,每相可提供高达约1.5 A的电流,无需散热器。每个线圈的额定电流为2.2A。
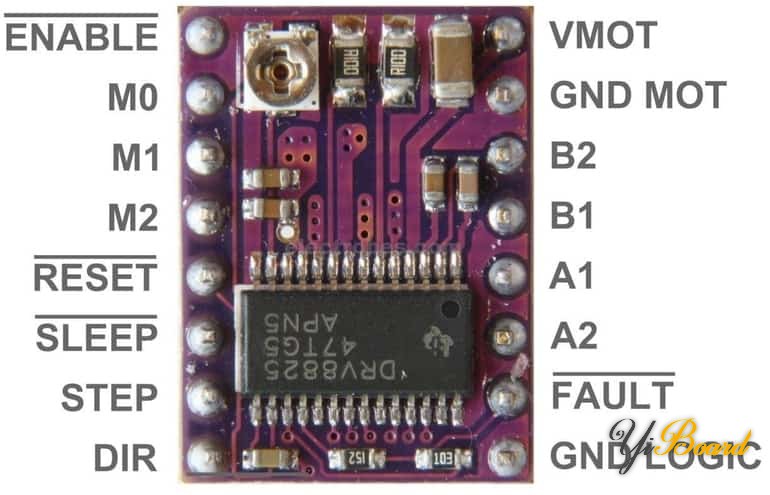
DRV8825驱动器共有16个引脚,如下所示:

1. 电源引脚:该引脚包括VMOT、GND MOT和GND Logic。DRV8825模块没有任何逻辑电源引脚,因为它从内部3V3稳压器获取电源。VMOT为电机供电,大约为8.2V至45V。 2. 微步选择引脚:DRV8825 驱动器具有三步分辨率选择器输入,即M0、M1和M2。通过为这些引脚设置适当的逻辑电平,我们将至少将电机设置为六步分辨率之一。 3. 控制输入引脚:STEP和DIR是2个控制输入引脚。STEP输入控制电机的微步。脉冲越快,电机旋转得越快。DIR输入控制电机的旋转方向。拉高驱动电机顺时针,拉低驱动电机逆时针。 4. 电源状态控制引脚:DRV8825具有三个不同的输入来控制其电源状态,即EN、RST和SLP。默认情况下,EN引脚始终为低电平有效输入,从而启用驱动器。 SLP引脚为低电平有效输入。将此引脚拉低会使驱动器进入睡眠模式,从而最大限度地减少设备消耗。 RST是一个低电平输入有效,当拉低时,所有STEP输入都被忽略。它还通过将内部转换器设置为电机初始阶段来复位驱动器。 5. 输出引脚:有4个输出引脚,分别为B2、B1、A2、A1。我们可以将电压在8.2V至45V之间的任何双极步进电机连接到这些引脚。模块上的每个输出引脚可为电机提供高达 2.2A 的电流 6. 故障检测引脚:DRV8825具有一个故障输出,只要H桥FET由于过流保护或热关断而被禁用,该输出就会驱动为低电平。故障引脚与SLEEP引脚短路,当它被驱动为低电平时,整个芯片被禁用。
设置电流极限值 在我们连接电机之前,我们应该调整驱动器的电流极限值,使电流在电机的极限值范围内。我们可以通过使用板上的电位器调整参考电压并参考下面的等式。 电流限制 = VRef x 2 例如,如果步进电机的额定电流为350mA,我们需要将参考电压调整为0.17V。拿一把小螺丝刀,用电位器调节限流,直到达到额定电流。

NEMA17步进电机 NEMA17是一款混合步进电机,步距角为1.8°(200 步/转)。每相在4V时消耗1.2 A,允许3.2 kg-cm的保持扭矩。NEMA17步进电机通常用于打印机、CNC机器和激光切割机。

该电机有六根电线,连接到两个分离绕组。黑色、黄色、绿色线是第一个绕组的一部分,而红色、白色和蓝色是第二个绕组的一部分。

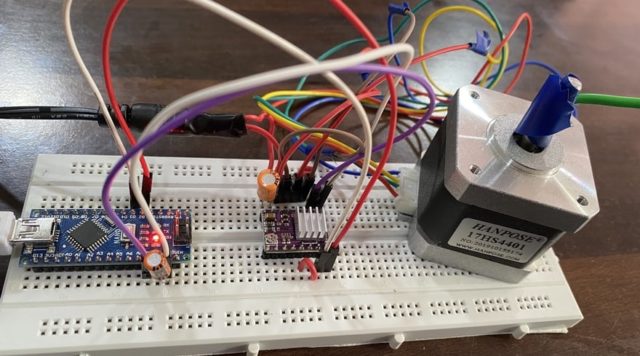
使用DRV8825驱动程序将NEMA17步进电机与Arduino连接 现在让我们将DRV8825步进电机驱动器连接到Arduino开发板,并控制NEMA17步进电机。我使用D2和D3引脚来控制电机方向和步进。连接示意图如下。

VMOT引脚由12V电源供电,而VDD由5V电源供电。记得在靠近电路板的电机电源引脚上放置一个100µF的大去耦电解电容。

步进电机控制的基本代码 现在您已经连接了驱动程序并设置了电流极限值,现在可以将Arduino连接到计算机并上传一些代码了。以下代码在单个方向上控制电机。 - const int dirPin = 2;
- const int stepPin = 3;
- const int stepsPerRevolution = 200;
-
- void setup()
- {
- // Declare pins as Outputs
- pinMode(stepPin, OUTPUT);
- pinMode(dirPin, OUTPUT);
- }
- void loop()
- {
- // Set motor direction clockwise
- digitalWrite(dirPin, HIGH);
-
- // Spin motor slowly
- for(int x = 0; x < stepsPerRevolution; x++)
- {
- digitalWrite(stepPin, HIGH);
- delayMicroseconds(2000);
- digitalWrite(stepPin, LOW);
- delayMicroseconds(2000);
- }
- delay(1000); // Wait a second
-
- // Set motor direction counterclockwise
- digitalWrite(dirPin, LOW);
-
- // Spin motor quickly
- for(int x = 0; x < stepsPerRevolution; x++)
- {
- digitalWrite(stepPin, HIGH);
- delayMicroseconds(1000);
- digitalWrite(stepPin, LOW);
- delayMicroseconds(1000);
- }
- delay(1000); // Wait a second
- }
控制步进电机旋转方向 使用以下代码,可以控制步进电机方向。 您可以顺时针方向或逆时针方向旋转电机。 该草图代码控制步进电机的速度、转数和旋转方向。 - const int dirPin = 2;
- const int stepPin = 3;
- const int stepsPerRevolution = 200;
-
- void setup()
- {
- // Declare pins as Outputs
- pinMode(stepPin, OUTPUT);
- pinMode(dirPin, OUTPUT);
- }
- void loop()
- {
- // Set motor direction clockwise
- digitalWrite(dirPin, HIGH);
-
- // Spin motor slowly
- for(int x = 0; x < stepsPerRevolution; x++)
- {
- digitalWrite(stepPin, HIGH);
- delayMicroseconds(2000);
- digitalWrite(stepPin, LOW);
- delayMicroseconds(2000);
- }
- delay(1000); // Wait a second
-
- // Set motor direction counterclockwise
- digitalWrite(dirPin, LOW);
-
- // Spin motor quickly
- for(int x = 0; x < stepsPerRevolution; x++)
- {
- digitalWrite(stepPin, HIGH);
- delayMicroseconds(1000);
- digitalWrite(stepPin, LOW);
- delayMicroseconds(1000);
- }
- delay(1000); // Wait a second
- }
使用AccelStepper库控制步进电机 步进电机可以使用Arduino AccelStepper库进行控制。 它为2、3或4针步进电机和电机驱动器提供面向对象的接口。
AccelStepper以多种方式显着改进了标准Arduino Stepper 库,例如它支持加速和减速。 它还支持多个同时步进器,每个步进器上具有独立的并发步进。 甚至还支持非常慢的速度。 - #include <AccelStepper.h>
-
- // Define stepper motor connections and motor interface type. Motor interface type must be set to 1 when using a driver:
- #define dirPin 2
- #define stepPin 3
- #define motorInterfaceType 1
-
- // Create a new instance of the AccelStepper class:
- AccelStepper stepper = AccelStepper(motorInterfaceType, stepPin, dirPin);
-
- void setup() {
- // Set the maximum speed in steps per second:
- stepper.setMaxSpeed(1000);
- }
-
- void loop()
- {
- // Set the current position to 0:
- stepper.setCurrentPosition(0);
-
- // Run the motor forward at 200 steps/second until the motor reaches 400 steps (2 revolutions):
- while(stepper.currentPosition() != 400)
- {
- stepper.setSpeed(200);
- stepper.runSpeed();
- }
-
- delay(1000);
-
- // Reset the position to 0:
- stepper.setCurrentPosition(0);
-
- // Run the motor backwards at 600 steps/second until the motor reaches -200 steps (1 revolution):
- while(stepper.currentPosition() != -200)
- {
- stepper.setSpeed(-600);
- stepper.runSpeed();
- }
-
- delay(1000);
-
- // Reset the position to 0:
- stepper.setCurrentPosition(0);
-
- // Run the motor forward at 400 steps/second until the motor reaches 600 steps (3 revolutions):
- while(stepper.currentPosition() != 600)
- {
- stepper.setSpeed(400);
- stepper.runSpeed();
- }
-
- delay(3000);
- }
|  |手机版|YiBoard一板网
( 冀ICP备18020117号 )