|
旋转编码器(Rotary Encoder)是一种位置传感器,可将旋钮的角度位置(旋转)转换为输出信号,用于确定旋钮的旋转方向。
由于它们的稳健性和精细的数字控制;它们用于许多应用,包括机器人、CNC机器和打印机。
市场上有两种类型的旋转编码器 - 绝对式和增量式。绝对编码器以度为单位为我们提供旋钮的精确位置,而增量编码器报告轴移动了多少增量。本文中使用的旋转编码器是增量型的。
旋转编码器与电位器 旋转编码器是等效于现代数字的电位器,比电位器更通用。
它们可以完全旋转没有末端,而电位器只能旋转大约3/4圈。
电位器最适合需要知道旋钮确切位置的情况。但是,旋转编码器最适合您需要知道位置变化而不是确切位置的情况。
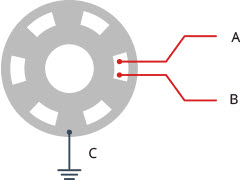
旋转编码器的工作原理 编码器内部是一个开槽圆盘,连接到公共接地引脚C,以及两个接触引脚A和B,如下图所示。

当您转动旋钮时,A和B会与公共接地引脚C接触,具体顺序取决于您转动旋钮的方向。
当它们与公共接地接触时,它们会产生信号。当一个引脚在另一个引脚之前接触时,这些信号彼此相位相差 90°。这称为正交编码。

顺时针转动旋钮时,首先连接A引脚,然后连接B引脚。当您逆时针转动旋钮时,首先连接B引脚,然后连接A引脚。
通过跟踪每个引脚何时连接和断开接地,我们可以使用这些信号变化来确定旋钮旋转的方向。您可以通过在A更改状态时简单地观察B的状态来做到这一点。
当A改变状态时: 如果 B != A,则旋钮顺时针旋转。

如果 B = A,则旋钮逆时针旋转。

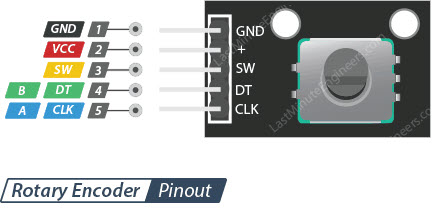
旋转编码器引脚 旋转编码器的引脚分配如下:

GND 是接地连接。 VCC 是电源电压,通常为3.3或5V。 SW 是低电平有效按钮开关输出。按下旋钮时,电压变为低电平。 DT(输出 B)与 CLK 输出相同,但它比 CLK 滞后 90° 相移。该输出可用于确定旋转方向。 CLK(输出 A)是确定旋转量的主要输出脉冲。每次将旋钮沿任一方向旋转一个棘爪(咔嗒声)时,“CLK”输出都会经历一个从高电平到低电平的循环。
旋转编码器与Arduino开发板的硬件连接 现在我们已经了解了有关旋转编码器的一切,是时候使用它了!
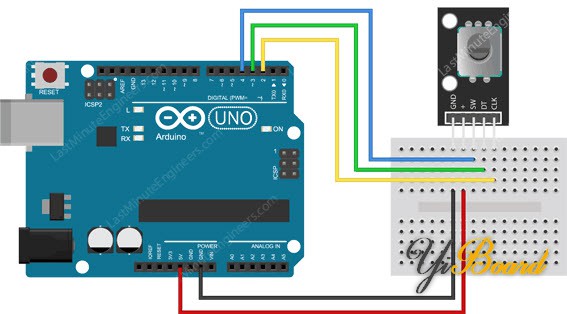
让我们将旋转编码器连接到 Arduino。连接相当简单。首先将模块上的+V引脚连接到Arduino上的5V,GND引脚连接到地。
现在将CLK和DT引脚分别连接到数字引脚#2 和#3。最后,将SW引脚连接到数字引脚#4。
下图显示了接线。

读取旋转编码器的Arduino代码 现在您已经连接了编码器,您需要一个草图才能使其全部工作。
以下草图检测编码器何时旋转,确定其旋转方向以及按钮是否被按下。试试草图; 然后我们将详对其介绍。 - // Rotary Encoder Inputs
- #define CLK 2
- #define DT 3
- #define SW 4
- int counter = 0;
- int currentStateCLK;
- int lastStateCLK;
- String currentDir ="";
- unsigned long lastButtonPress = 0;
- void setup() {
-
- // Set encoder pins as inputs
- pinMode(CLK,INPUT);
- pinMode(DT,INPUT);
- pinMode(SW, INPUT_PULLUP);
- // Setup Serial Monitor
- Serial.begin(9600);
- // Read the initial state of CLK
- lastStateCLK = digitalRead(CLK);
- }
- void loop() {
-
- // Read the current state of CLK
- currentStateCLK = digitalRead(CLK);
- // If last and current state of CLK are different, then pulse occurred
- // React to only 1 state change to avoid double count
- if (currentStateCLK != lastStateCLK && currentStateCLK == 1){
- // If the DT state is different than the CLK state then
- // the encoder is rotating CCW so decrement
- if (digitalRead(DT) != currentStateCLK) {
- counter --;
- currentDir ="CCW";
- } else {
- // Encoder is rotating CW so increment
- counter ++;
- currentDir ="CW";
- }
- Serial.print("Direction: ");
- Serial.print(currentDir);
- Serial.print(" | Counter: ");
- Serial.println(counter);
- }
- // Remember last CLK state
- lastStateCLK = currentStateCLK;
- // Read the button state
- int btnState = digitalRead(SW);
- //If we detect LOW signal, button is pressed
- if (btnState == LOW) {
- //if 50ms have passed since last LOW pulse, it means that the
- //button has been pressed, released and pressed again
- if (millis() - lastButtonPress > 50) {
- Serial.println("Button pressed!");
- }
- // Remember last button press event
- lastButtonPress = millis();
- }
- // Put in a slight delay to help debounce the reading
- delay(1);
- }
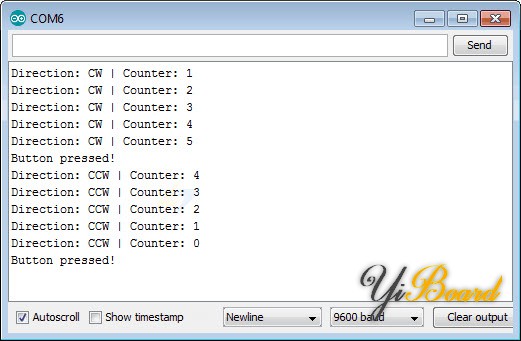
如果一切正常,您应该在串口监视器上看到以下输出。

代码说明 首先在草图中声明编码器的CLK、DT和SW引脚连接到的Arduino引脚。 - #define CLK 2
- #define DT 3
- #define SW 4
接下来,定义了几个整数变量。变量counter表示每次将旋钮旋转一个定位器时将修改的计数。currentStateCLK和lastStateCLK变量保存CLK输出的状态,并用于确定旋转量。
在串口监视器上打印当前旋转方向时,将使用一个名为currentDir的字符串。
lastButtonPress变量用于消除开关的抖动。 - int counter = 0;
- int currentStateCLK;
- int lastStateCLK;
- String currentDir ="";
- unsigned long lastButtonPress = 0;
现在在setup()函数中,我们首先将与编码器的连接定义为输入,然后我们启用SW引脚上的输入上拉电阻。我们还设置了串口监视器。
最后,我们读取CLK引脚的当前值并将其存储在lastStateCLK变量中。 - pinMode(CLK,INPUT);
- pinMode(DT,INPUT);
- pinMode(SW, INPUT_PULLUP);
- Serial.begin(9600);
- lastStateCLK = digitalRead(CLK);
在loop()函数中,我们再次检查CLK状态并将其与lastStateCLK值进行比较。如果它们不同,则表示旋钮已转动并出现脉冲。我们还检查 currentStateCLK 的值是否为 1,以便仅对一个状态更改做出反应以避免重复计数。 - currentStateCLK = digitalRead(CLK);
- if (currentStateCLK != lastStateCLK && currentStateCLK == 1){
在if条件语句中,我们确定旋转方向。为此,我们只需读取编码器模块上的DT引脚并将其与CLK引脚的当前状态进行比较。
如果它们不同,则表示旋钮逆时针旋转。然后我们递减计数器并将 currentDir 设置为“CCW”。
如果两个值相同,则表示旋钮顺时针旋转。然后我们增加计数器并将 currentDir 设置为“CW”。 - if (digitalRead(DT) != currentStateCLK) {
- counter --;
- currentDir ="CCW";
- } else {
- counter ++;
- currentDir ="CW";
- }
然后我们在串口监视器上打印结果。 - Serial.print("Direction: ");
- Serial.print(currentDir);
- Serial.print(" | Counter: ");
- Serial.println(counter);
在if条件语句之外,我们用CLK的当前状态更新lastStateCLK。 - lastStateCLK = currentStateCLK;
接下来是读取和去抖动按钮开关的逻辑。我们首先读取当前按钮状态,如果它为LOW,我们等待50毫秒来消除按钮的抖动。
如果按钮保持低电平超过50毫秒,我们会在串口监视器上打印“Button pressed!”。 - int btnState = digitalRead(SW);
- if (btnState == LOW) {
- if (millis() - lastButtonPress > 50) {
- Serial.println("Button pressed!");
- }
- lastButtonPress = millis();
- }
|