风筝
发表于: 2022-6-23 11:45:46 | 显示全部楼层

您是否想在屋内听到距离您数公里远发生的事情,或者只需一个电话即可启动花园中的自动喷水系统;那么A6 GSM/GPRS模块可以作为您开始使用物联网的坚实起点!


A6 GSM/GPRS模块是一款微型GSM调制解调器,可集成到众多物联网项目中。您可以使用此模块完成普通手机可以完成的几乎任何事情,比如收发短信、接打电话、通过GPRS、TCP/IP等方式连接到互联网!最重要的是,该模块支持四频GSM/GPRS 网络,这意味着它几乎可以在世界的任何地方工作。


A6 GSM/GPRS模块硬件概述

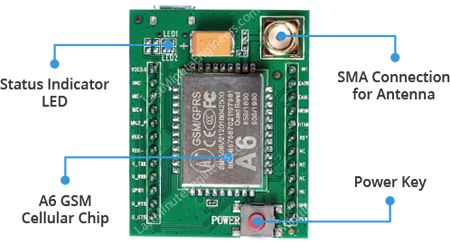
该模块主要基于Ai-Thinker(ESP8266 WiFi模块制造商)的A6 GSM蜂窝芯片。它通过UART与微控制器通信,支持从1200bps到115200bps的波特率,具有自动检波功能。 A6 GSM 芯片所有必要的数据管脚都引出到一个0.1英寸间距的排针。
A6-GSM-Module-Hardware-Overview-SMA-Antenna-Status-LED-Power-Key.jpg


该模块需要一个外部天线来进行任何类型的语音或数据通信以及一些SIM命令。因此,它通常配备一个具有2dBi增益和50Ω阻抗的小型鸭式天线,即使您的项目在室内也能提供很好的覆盖范围。


提供了一个电源按钮来手动打开/关闭模块,尽管您可以通过编程方式执行此操作。模块的状态由模块右上角的LED指示。
A6-GSM-Module-Hardware-Overview-MP1584-SIM-Socket.jpg


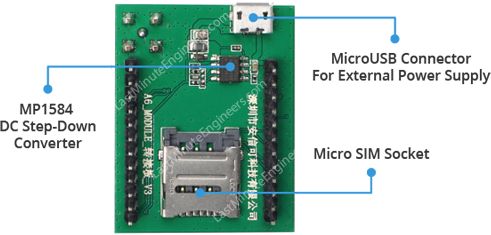
虽然模块可以工作在5V,但芯片的工作电压是3.3V到4.2V。为了将电源电压保持在4.1V,该模块配备了Monolithic Power Systems公司的高频降压开关稳压器MP1584,能够处理高达3A的负载电流。


该模块还可以通过微型USB连接器供电。您只需拿起手机充电器(5V 2A)并为模块通电即可。
A6-GSM-Module-SIM-Insertion-Direction.jpg

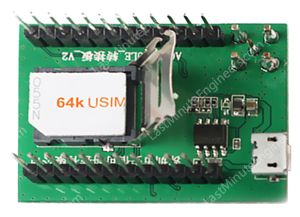
SIM卡座在模块背面,任何已激活的2G Micro SIM 卡都可以正常工作。SIM卡插槽的工作方式可能需要一些时间来适应。要解锁闩锁,请将组件的顶部推向微型USB连接器,然后将其向上提起。将SIM卡放入插槽底部,使SIM 卡的槽口远离微型USB连接器。然后将手臂折回插座主体,轻轻将其向前推向“LOCK”位置。


A6 GSM蜂窝芯片的尺寸小于一张邮票的大小,但在其小巧的框架中包含了惊人的功能。下面列出了其中一些:

●    支持四频:GSM850、EGSM900、DCS1800 和 PCS1900

●    使用任何2G SIM连接到任何全球GSM网络

●    使用外部 8Ω 扬声器和驻极体麦克风拨打和接听语音电话

●    可连接 4 极 TRRS 麦克风和耳机

●    发送和接收语音电话和短信

●    Class 10 GPRS,下载速度为 85.6Kbps,上传速度为 42.8Kbps

●    在待机模式下消耗小于 3mA

●    8V UART 端口电平——兼容 Arduino、Raspberry-Pi

●    发射功率:

      ●    GSM850/EGSM900 4 级 (2W)

      ●    DCS1800/PCS1900 1 级 (1W)

●    支持基于串口的AT指令集

●    支持Micro SIM卡


A6 GSM模块的引脚排列

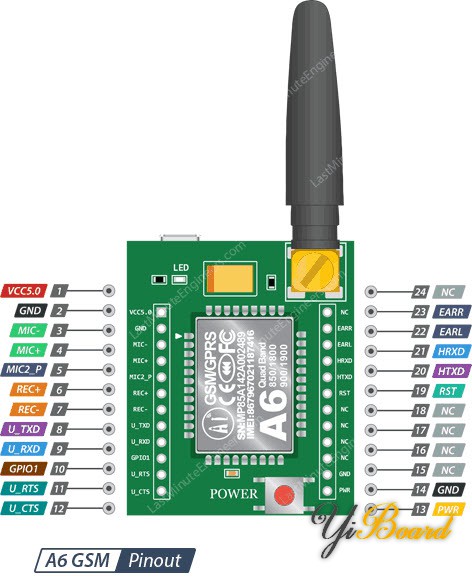
A6 GSM模块共有24个引脚用于与外界连接。连接如下:
A6-GSM-GPRS-Module-Pinout.jpg


VCC 为模块供电。将其连接到任何额定为 5V 2A 的外部电源。

GND 是接地引脚,需要连接到Arduino的GND引脚。

MIC± 是差分麦克风输入。麦克风的两个引脚可以直接连接到这些引脚。

MIC2_P 引脚用于连接4极 TRRS麦克风

REC± 是一个差分扬声器接口。 8Ω 扬声器的两个引脚可以直接连接到这两个引脚。

U_TxD(发送器)引脚用于串行通信。

U_RxD(接收器)引脚用于串行通信。

GPIO1 用于控制模块进入低功耗模式。

U_RTS(请求发送)是 UART 流控制引脚,允许接收器和发送器相互提醒它们的状态。

U_CTS(清除发送)是 UART 流控制引脚,允许接收器和发送器相互提醒它们的状态。

EAR_R 用于连接 4 极 TRRS 耳机

EAR_L 用于连接 4 极 TRRS 耳机

HST_RXD HOST UART 为调试UART,用于下载、校准、跟踪等。它不支持任何 AT 命令。该接口仅在调试时使用

HST_TXD UART 为调试UART,用于下载、校准、跟踪等。它不支持任何 AT 命令。该接口仅在调试时使用

RST(复位)是一个硬复位引脚。如果您绝对将模块置于不良空间,请将此引脚拉低 100 毫秒以执行硬复位。

NC 未连接

PWR 引脚用于以编程方式打开/关闭模块。为此,您必须将其拉高一会儿(小于 500 毫秒或左右)。


将A6 GSM模块连接到Arduino UNO

现在我们了解了有关该模块的所有信息,我们可以开始将它连接到Arduino!


首先,将模块上的U_TxD和U_RxD引脚连接到Arduino上的数字引脚#3 和#2,因为我们将使用软件串口与模块通信。将模块上的VCC引脚连接到5V 2A的外部电源。不要试图将此引脚连接到Arduino上的5V电源,因为不能提供足够电源电流,模块将无法工作。现在连接电路中的所有接地。最后,连接天线,将Micro SIM卡插入插座。
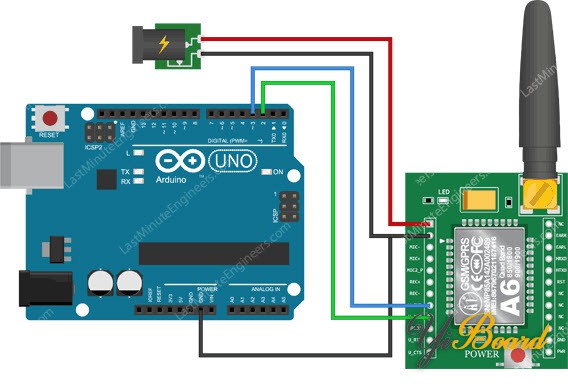
Arduino-Wiring-Fritzing-Connections-with-A6-GSM-GPRS-Module-External-Power-Supply.jpg

您也可以通过5V 2A适配器为模块供电,但请确保Arduino上的GND引脚连接到模块上的GND引脚。
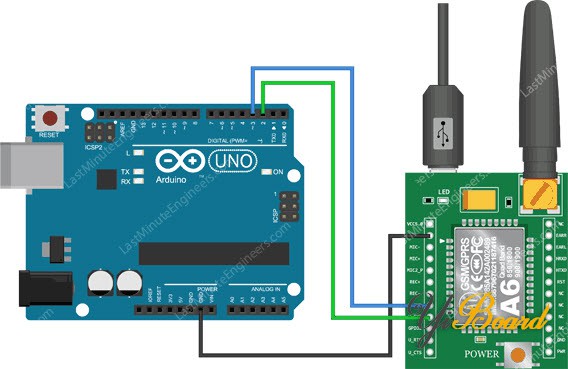
Arduino-Wiring-Fritzing-Connections-with-A6-GSM-GPRS-Module-USB-Power-Supply.jpg

一切就绪后,只需按2秒电源键即可开始使用!


跳转到指定楼层
风筝
发表于: 2022-6-23 11:53:12 | 显示全部楼层

Arduino代码 – 测试AT指令

为了发送AT命令实现与SIM800L模块之间的通信,我们将使用串口监视器。下面的草图代码将使Arduino能够通过串口监视器上与SIM800L模块进行通信。在我们继续详细讲解代码之前,将您的Arduino开发板连接到计算机,编译以下代码并将其上传到 Arduino。


打开串口监视器后,请确保已勾选“Both NL & CR”选项!

  1. #include <SoftwareSerial.h>

  2. //Create software serial object to communicate with SIM800L
  3. SoftwareSerial mySerial(3, 2); //SIM800L Tx & Rx is connected to Arduino #3 & #2

  4. void setup()
  5. {
  6.   //Begin serial communication with Arduino and Arduino IDE (Serial Monitor)
  7.   Serial.begin(9600);

  8.   //Begin serial communication with Arduino and SIM800L
  9.   mySerial.begin(9600);

  10.   Serial.println("Initializing...");
  11.   delay(1000);

  12.   mySerial.println("AT"); //Once the handshake test is successful, it will back to OK
  13.   updateSerial();
  14.   mySerial.println("AT+CSQ"); //Signal quality test, value range is 0-31 , 31 is the best
  15.   updateSerial();
  16.   mySerial.println("AT+CCID"); //Read SIM information to confirm whether the SIM is plugged
  17.   updateSerial();
  18.   mySerial.println("AT+CREG?"); //Check whether it has registered in the network
  19.   updateSerial();
  20. }

  21. void loop()
  22. {
  23.   updateSerial();
  24. }

  25. void updateSerial()
  26. {
  27.   delay(500);
  28.   while (Serial.available())
  29.   {
  30.     mySerial.write(Serial.read());//Forward what Serial received to Software Serial Port
  31.   }
  32.   while(mySerial.available())
  33.   {
  34.     Serial.write(mySerial.read());//Forward what Software Serial received to Serial Port
  35.   }
  36. }
复制代码

该草图首先包含SoftwareSerial.h库,并初始化SIM800L模块的Tx和Rx连接到的Arduino引脚。

  1. #include <SoftwareSerial.h>

  2. //Create software serial object to communicate with SIM800L
  3. SoftwareSerial mySerial(3, 2); //SIM800L Tx & Rx is connected to Arduino #3 & #2
复制代码

setup()函数中:我们以波特率9600初始化Arduino与Arduino IDE以及SIM800L模块之间的串口通信。

  1. //Begin serial communication with Arduino and Arduino IDE (Serial Monitor)
  2.   Serial.begin(9600);

  3.   //Begin serial communication with Arduino and SIM800L
  4.   mySerial.begin(9600);
复制代码

现在我们已经建立了基础的连接,然后将尝试通过发送AT命令与SIM800L模块进行通信。

AT - 最基本的AT指令。它还初始化自动波特率。如果它有效,您应该看到AT字符回显然后OK!然后,您可以发送一些命令来查询模块并获取有关它的信息,例如

AT+CSQ - 检查信号强度,第一个#是dB强度,应该高于5左右。越高越好。当然,这取决于您的天线和位置!

AT+CCID – 获取SIM卡的卡号,这测试SIM卡是否正常,您可以验证该号码是否写在卡上。

AT+CREG? - 检查您是否已在网络上注册。第二个# 应该是1或 5。1 表示您已注册到家庭网络,5 表示您在漫游网络。除了这两个数字外,表明您没有注册到任何网络。

  1.   mySerial.println("AT"); //Once the handshake test is successful, it will back to OK
  2.   updateSerial();
  3.   mySerial.println("AT+CSQ"); //Signal quality test, value range is 0-31 , 31 is the best
  4.   updateSerial();
  5.   mySerial.println("AT+CCID"); //Read SIM information to confirm whether the SIM is plugged
  6.   updateSerial();
  7.   mySerial.println("AT+CREG?"); //Check whether it has registered in the network
  8.   updateSerial();
复制代码

loop()函数中,我们调用了名为 updateSerial() 的自定义函数,它持续等待来自串口监视器的任何输入,并通过D2引脚(模块的Rx)将其发送到SIM800L模块。如果SIM800L模块有任何响应,它还会连续读取D3引脚(模块的 Tx)。

  1. void updateSerial()
  2. {
  3.   delay(500);
  4.   while (Serial.available())
  5.   {
  6.     mySerial.write(Serial.read());//Forward what Serial received to Software Serial Port
  7.   }
  8.   while(mySerial.available())
  9.   {
  10.     Serial.write(mySerial.read());//Forward what Software Serial received to Serial Port
  11.   }
  12. }
复制代码

您应该在串口监视器上看到以下输出。

A6-GSM-Module-Basic-AT-Commands-on-Arduino.jpg


现在您可以通过串口监视器发送任何命令,如下所示,提供有关网络连接和电池状态的更多信息:

ATI – 获取模块名称和版本

AT+COPS?  –  检查您是否已连接到网络,在本例中为 BSNL

AT+COPS=? – 返回网络中存在的运营商列表。

AT+CBC – 将返回电池状态。第二个数字是 % 电量(在本例中为 93%),第三个数字是以 mV 为单位的实际电压(在本例中为 3.877 V)

A6-GSM-Module-Network-Connection-AT-Commands-on-Arduino.jpg


回复

使用道具 举报

风筝
发表于: 2022-6-23 11:58:18 | 显示全部楼层

Arduino代码 – 发送短信

让我们继续讨论有趣的事情。我们对Arduino进行编程,实现向您希望的任何电话号码发送短信。在尝试草图之前,您需要输入电话号码。搜索字符串 ZZxxxxxxxxxx 并将 ZZ 替换为国家代码,将 xxxxxxxxxx 替换为 11位电话号码。

  1. #include <SoftwareSerial.h>

  2. //Create software serial object to communicate with SIM800L
  3. SoftwareSerial mySerial(3, 2); //SIM800L Tx & Rx is connected to Arduino #3 & #2

  4. void setup()
  5. {
  6.   //Begin serial communication with Arduino and Arduino IDE (Serial Monitor)
  7.   Serial.begin(9600);

  8.   //Begin serial communication with Arduino and SIM800L
  9.   mySerial.begin(9600);

  10.   Serial.println("Initializing...");
  11.   delay(1000);

  12.   mySerial.println("AT"); //Once the handshake test is successful, it will back to OK
  13.   updateSerial();

  14.   mySerial.println("AT+CMGF=1"); // Configuring TEXT mode
  15.   updateSerial();
  16.   mySerial.println("AT+CMGS="+ZZxxxxxxxxxx"");//change ZZ with country code and xxxxxxxxxxx with phone number to sms
  17.   updateSerial();
  18.   mySerial.print("Last Minute Engineers | lastminuteengineers.com"); //text content
  19.   updateSerial();
  20.   mySerial.write(26);
  21. }

  22. void loop()
  23. {
  24. }

  25. void updateSerial()
  26. {
  27.   delay(500);
  28.   while (Serial.available())
  29.   {
  30.     mySerial.write(Serial.read());//Forward what Serial received to Software Serial Port
  31.   }
  32.   while(mySerial.available())
  33.   {
  34.     Serial.write(mySerial.read());//Forward what Software Serial received to Serial Port
  35.   }
  36. }
复制代码

除了下面的代码片段外,该草图几乎与之前相同。建立连接后,我们发送以下 AT 命令:

AT+CMGF=1 – 选择 SMS 消息格式为文本。默认格式为协议数据单元 (PDU)

AT+CMGS=+ZZxxxxxxxxxx – 向指定的电话号码发送短信。输入的文本消息后跟“Ctrl+z”字符被视为 SMS。 ‘Ctrl+z’ 实际上是 ASCII 表中描述为 ‘substitute’ 的第 26 个非打印字符。因此,我们需要在发送消息后发送 26 (1A)。

  1.   mySerial.println("AT+CMGF=1"); // Configuring TEXT mode
  2.   updateSerial();
  3.   mySerial.println("AT+CMGS="+ZZxxxxxxxxxx"");//change ZZ with country code and xxxxxxxxxxx with phone number to sms
  4.   updateSerial();
  5.   mySerial.print("Last Minute Engineers | lastminuteengineers.com"); //text content
  6.   updateSerial();
  7.   mySerial.write(26);
复制代码

loop函数内部保持为空,因为我们只想发送一次 SMS。如果您想再发送一次短信,只需按下Arduino上的复位键。下面的截图显示了从 SIM800L GSM 模块发送的短信。

A6-GSM-Module-AT-Commands-for-Sending-SMS-on-Arduino.png


Arduino代码 - 读取短信

现在让我们对Arduino进行编程以读取接收的短信消息。当您需要在收到特定 SMS 时触发操作时,此草图非常有用。例如,当Arduino收到一条短信时,您可以指示它打开或关闭继电器。

  1. #include <SoftwareSerial.h>

  2. //Create software serial object to communicate with SIM800L
  3. SoftwareSerial mySerial(3, 2); //SIM800L Tx & Rx is connected to Arduino #3 & #2

  4. void setup()
  5. {
  6.   //Begin serial communication with Arduino and Arduino IDE (Serial Monitor)
  7.   Serial.begin(9600);

  8.   //Begin serial communication with Arduino and SIM800L
  9.   mySerial.begin(9600);

  10.   Serial.println("Initializing...");
  11.   delay(1000);

  12.   mySerial.println("AT"); //Once the handshake test is successful, it will back to OK
  13.   updateSerial();

  14.   mySerial.println("AT+CMGF=1"); // Configuring TEXT mode
  15.   updateSerial();
  16.   mySerial.println("AT+CNMI=1,2,0,0,0"); // Decides how newly arrived SMS messages should be handled
  17.   updateSerial();
  18. }

  19. void loop()
  20. {
  21.   updateSerial();
  22. }

  23. void updateSerial()
  24. {
  25.   delay(500);
  26.   while (Serial.available())
  27.   {
  28.     mySerial.write(Serial.read());//Forward what Serial received to Software Serial Port
  29.   }
  30.   while(mySerial.available())
  31.   {
  32.     Serial.write(mySerial.read());//Forward what Software Serial received to Serial Port
  33.   }
  34. }
复制代码

除了下面的代码片段外,该草图与前面的相似。建立连接后,我们发送以下AT命令:

AT+CMGF=1 – 选择 SMS 消息格式为文本。默认格式为协议数据单元 (PDU)

AT+CNMI=1,2,0,0,0 – 指定应如何处理新到达的 SMS 消息。通过这种方式,您可以告诉 SIM800L 模块将新到达的 SMS 消息直接转发到计算机,或者将它们保存在消息存储中,然后通知计算机它们在消息存储中的位置。

响应以 +CMT 开头:响应中的所有字段都以逗号分隔,第一个字段是电话号码。第二个字段是发送短信的人的姓名。第三个字段是时间戳,而第四个字段是实际消息。

  1.   mySerial.println("AT+CMGF=1"); // Configuring TEXT mode
  2.   updateSerial();
  3.   mySerial.println("AT+CNMI=1,2,0,0,0"); // Decides how newly arrived SMS messages should be handled
  4.   updateSerial();
复制代码

请注意,这次我们没有将循环函数保持为空,因为我们需要轮询新到达的短信。将短信发送到SIM800L模块后,您将在串口监视器上看到以下输出。

A6-GSM-Module-AT-Commands-for-Reading-SMS-on-Arduino.png


扩展 Arduino 软件串口缓冲区大小

如果您的短信内容比较长,那么您可能会收到一些缺少字符的短信。这不是因为代码错误。SoftwareSerial接收缓冲区被填满并丢弃字符。您从缓冲区读取的速度不够快。


最简单的解决方案是将SoftwareSerial缓冲区的大小从其默认6 字节增加到256 字节。


在计算机上,转到 C:\Program Files (x86) -> Arduino -> hardware -> Arduino -> avr -> libraries -> SoftwareSerial ,打开 SoftwareSerial.h 并更改该代码:

  1. // RX buffer size
  2. #define _SS_MAX_RX_BUFF 64
复制代码

修改代码为:

  1. // RX buffer size
  2. #define _SS_MAX_RX_BUFF 256
复制代码

保存文件并再次测试您的草图。

Expanding-Arduino-SoftwareSerial-Buffer-Size.jpg


回复

使用道具 举报

风筝
发表于: 2022-6-23 14:16:43 | 显示全部楼层

Arduino代码 – 拨打电话

现在让我们对Arduino进行编程实现拨打电话。当您希望您的Arduino在温度过高或有人闯入您家的紧急情况下拨打求救电话时,此草图代码非常有用。


在尝试草图之前,您需要输入电话号码。搜索字符串 ZZxxxxxxxxxx 并将ZZ替换为国家代码,将 xxxxxxxxxx 替换为11位电话号码。

  1. #include <SoftwareSerial.h>

  2. //Create software serial object to communicate with SIM800L
  3. SoftwareSerial mySerial(3, 2); //SIM800L Tx & Rx is connected to Arduino #3 & #2

  4. void setup()
  5. {
  6.   //Begin serial communication with Arduino and Arduino IDE (Serial Monitor)
  7.   Serial.begin(9600);

  8.   //Begin serial communication with Arduino and SIM800L
  9.   mySerial.begin(9600);

  10.   Serial.println("Initializing...");
  11.   delay(1000);

  12.   mySerial.println("AT"); //Once the handshake test is successful, i t will back to OK
  13.   updateSerial();

  14.   mySerial.println("ATD+ +ZZxxxxxxxxxx;"); //  change ZZ with country code and xxxxxxxxxxx with phone number to dial
  15.   updateSerial();
  16.   delay(20000); // wait for 20 seconds...
  17.   mySerial.println("ATH"); //hang up
  18.   updateSerial();
  19. }

  20. void loop()
  21. {
  22. }

  23. void updateSerial()
  24. {
  25.   delay(500);
  26.   while (Serial.available())
  27.   {
  28.     mySerial.write(Serial.read());//Forward what Serial received to Software Serial Port
  29.   }
  30.   while(mySerial.available())
  31.   {
  32.     Serial.write(mySerial.read());//Forward what Software Serial received to Serial Port
  33.   }
  34. }
复制代码

要拨打电话,请使用以下 AT 命令:

ATD+ +ZZxxxxxxxxxx; – 拨打指定号码。末尾的分号 (;) 修饰符将拨号字符串分隔为多个拨号命令。除了最后一个命令之外的所有命令都必须以分号 (;) 修饰符结尾。

ATH - 挂断电话

  1.   mySerial.println("ATD+ +ZZxxxxxxxxxx;"); //  change ZZ with country code and xxxxxxxxxxx with phone number to dial
  2.   updateSerial();
  3.   delay(20000); // wait for 20 seconds...
  4.   mySerial.println("ATH"); //hang up
  5.   updateSerial();
复制代码

下面的屏幕截图显示了从SIM800L模块进行的呼叫电话。

A6-GSM-Module-AT-Commands-for-Making-Call-on-Arduino.png


Receiving-Call-through-A6-GSM-Module.jpg


Arduino代码 – 接听电话

接听电话不需要任何特殊代码;你只需要持续监听SIM800L模块。但是,当您需要在收到来自特定电话号码的呼叫时触发操作时,您可能会发现此草图非常有用。

  1. #include <SoftwareSerial.h>

  2. //Create software serial object to communicate with SIM800L
  3. SoftwareSerial mySerial(3, 2); //SIM800L Tx & Rx is connected to Arduino #3 & #2

  4. void setup()
  5. {
  6.   //Begin serial communication with Arduino and Arduino IDE (Serial Monitor)
  7.   Serial.begin(9600);

  8.   //Begin serial communication with Arduino and SIM800L
  9.   mySerial.begin(9600);

  10.   Serial.println("Initializing...");
  11. }

  12. void loop()
  13. {
  14.   updateSerial();
  15. }

  16. void updateSerial()
  17. {
  18.   delay(500);
  19.   while (Serial.available())
  20.   {
  21.     mySerial.write(Serial.read());//Forward what Serial received to Software Serial Port
  22.   }
  23.   while(mySerial.available())
  24.   {
  25.     Serial.write(mySerial.read());//Forward what Software Serial received to Serial Port
  26.   }
  27. }
复制代码

来电通常由串口监视器上的“RING”指示,后跟电话号码和来电显示。要接听/挂断电话,请使用 AT 命令:

ATA - 接听来电。

ATH - 挂断电话。挂断电话时,它会在串口监视器上发送 NO CARRIER 指示呼叫无法连接。


下面串口监视器上的输出显示SIM800L模块收到的呼叫。

A6-GSM-Module-AT-Commands-for-Receiving-Call-on-Arduino.png


Calling-through-A6-GSM-Module.jpg


回复

使用道具 举报

您需要登录后才可以回帖 登录 | 立即注册

本版积分规则

主题 714 | 回复: 1501


手机版|

GMT+8, 2024-12-22 00:41 , Processed in 0.071171 second(s), 9 queries , Gzip On, MemCache On. Powered by Discuz! X3.5

YiBoard一板网 © 2015-2022 地址:河北省石家庄市长安区高营大街 ( 冀ICP备18020117号 )

快速回复 返回顶部 返回列表