|
在本篇文章中,您将了解IR协议以及如何使用IR接收器模块。首先,您将看到IR协议的工作原理,然后您将学习使用Arduino和红外遥控套件。还提供了一些实用示例,以帮助您更好地学习它。
IR协议简介 IR红外通信是最常用的无线通信方法之一,因为它易于使用且价格合理。波长比可见光长的红外光不在人类视觉范围内。这就是为什么它是无线通信的好选择。当您按下电视控制器上的按钮时,控制器上的LED会持续打开和关闭,并使调制的红外信号从控制器发送到电视。该信号在解调后执行。IR接收器模块用于接收IR信号。这些模块工作频率为3.8 KHz。当传感器未以工作频率暴露在任何光线下时,VOUT输出的值等于VS(电源)。当暴露在38 kHz红外光下时,此输出将为零。


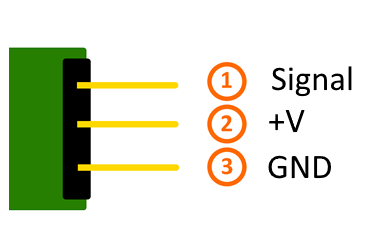
这些模块有3个引脚用于VOUT、VDD和地,因此在电路中非常容易使用它们。
所需的材料 ● Arduino UNO开发板 ● RGB LED灯 ● 红外遥控和红外传感器 ● 跳线 ● Arduino IDE
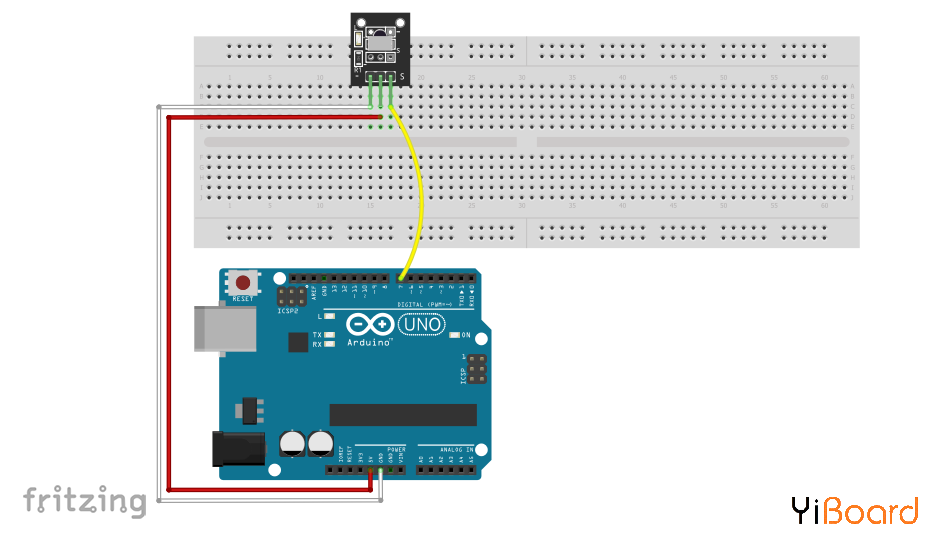
找到每个遥控器按键的代码 在这部分中,我们要在Arduino和IR发送器、接收器之间建立连接。为此,我们首先需要知道遥控器上每个按钮的代码。通过按下每个按钮,特定信号发送到接收器并将显示在串行监视器窗口中。
电路连接:

代码: 您需要安装IR库才能使用IR模块。从以下链接下载库,在Sketch窗口中,打开Include library选项并选择IRRemote.h。
默认情况下,此库可能在您的Arduino库中可用。 - /*
- * IR read codes
- * by Hanie kiani
- * https://electropeak.com/learn/
- */
- #include <IRremote.h> //including infrared remote header file
- int RECV_PIN = 7; // the pin where you connect the output pin of IR sensor
- IRrecv irrecv(RECV_PIN);
- decode_results results;
- void setup()
- {
- Serial.begin(9600);
- irrecv.enableIRIn();
- {
- void loop()
- {
- if (irrecv.decode(&results))// Returns 0 if no data ready, 1 if data ready.
- {
- int results.value = results;// Results of decoding are stored in result.value
- Serial.println(" ");
- Serial.print("Code: ");
- Serial.println(results.value); //prints the value a a button press
- Serial.println(" ");
- irrecv.resume(); // Restart the ISR state machine and Receive the next value
- }
让我们仔细看看代码: - int RECV_PIN = 7;
- IRrecv irrecv(RECV_PIN);
以上代码指定连接到接收器模块输出的引脚。 初始化接收IR信号 - if (irrecv.decode(&results))
irrecv.decode(&results)函数对接收到的IR信号进行解码并将其存储在变量中。没有收到任何内容时返回0。
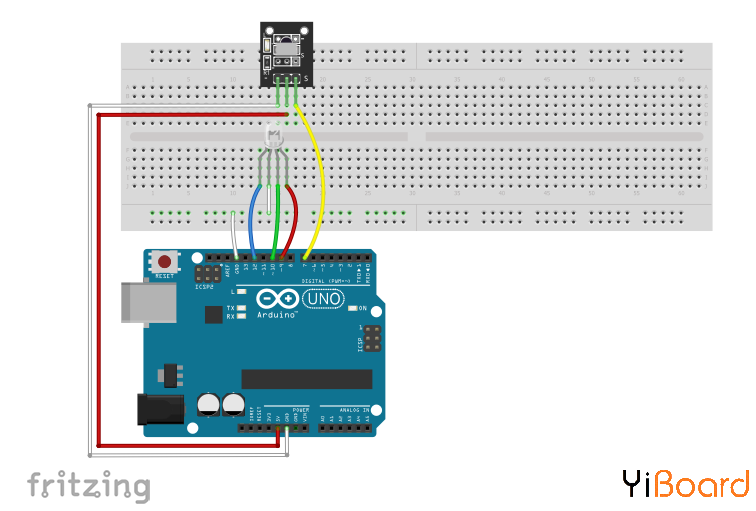
使用红外遥控器控制RGB LED颜色 找到每个按钮的代码后,可以使用它来控制命令。在此示例中,我们将RGB LED连接到Arduino并使用遥控器更改颜色。为此,请在遥控器上指定几个按钮并保存其代码。在该示例中,使用按钮1至3。然后为每个按钮指定特定颜色。最后,按下1至3键中的任意一个,LED会改变其颜色。
电路连接

代码 - /*
- * IR read codes
- * by Hanie kiani
- * https://electropeak.com/learn/
- */
- #include <IRremote.h>
-
- int RECV_PIN =6;
- int bluePin = 11;
- int greenPin = 10;
- int redPin = 9;
- IRrecv irrecv(RECV_PIN);
- decode_results results;
-
- void setup(){
- Serial.begin(9600);
- irrecv.enableIRIn();
- pinMode(redPin, OUTPUT);
- pinMode(greenPin, OUTPUT);
- pinMode(bluePin, OUTPUT);
- }
-
- void loop(){
- if (irrecv.decode(&results)){
- int value = results.value;
- Serial.println(value);
- switch(value){
- case 12495: //Keypad button "1"
- //set color red
- analogWrite(redPin, 0xFF);
- analogWrite(greenPin,0x08);
- analogWrite(bluePin, 0xFB);
- }
-
- switch(value){
- case -7177: //Keypad button "2"
- //set color skyblue
- analogWrite(redPin, 0x00);
- analogWrite(greenPin,0xFF);
- analogWrite(bluePin, 0xFF);
- }
- switch(value){
- case 539: //Keypad button "3"
- //set color pink
- analogWrite(redPin, 0x1F);
- analogWrite(greenPin,0x00);
- analogWrite(bluePin, 0x8F);
- }
- switch(value){
- case 25979: //Keypad button "4"
- //set color light green
- analogWrite(redPin, 0x11);
- analogWrite(greenPin,0x5F);
- analogWrite(bluePin, 0x01);
- }
-
- irrecv.resume();
- }
- }
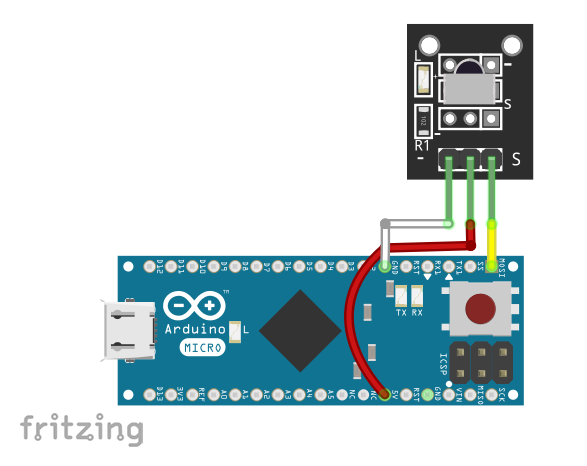
使用红外遥控器播放超级马里奥! 现在,您将使用IR遥控器而不是键盘来玩超级马里奥。 要做到这一点,你需要一台Arduino Leonardo或Micro开发板。
电路连接

代码 为了控制键盘,你需要keyboard.h库。 您可以在以下链接中找到它:Keyboard.h库。 - /*
- * IR REMOTE CONTROL + RGB
- * by Hanie Kiani
- * https://electropeak.com/learn/
- */
-
- #include <IRremote.h>
- #include <Keyboard.h>
-
-
- int RECV_PIN = 11;
- IRrecv irrecv(RECV_PIN);
- decode_results results;
-
- void setup()
- {
- Serial.begin(9600);
- irrecv.enableIRIn(); // Start the receiver
- Keyboard.begin();
- }
-
- void loop() {
- if (irrecv.decode(&results))
- { int value = results.value;
- Serial.println(value);
- switch(value)
- {
-
- //Backward key is used for left key operation
- case 8925: Keyboard.press(KEY_LEFT_ARROW); //left key
- delay(100);
- Keyboard.releaseAll();
- break;
- //Forward Key is used for right key operation
- case 765: Keyboard.press(KEY_RIGHT_ARROW); //right key
- delay(100);
- Keyboard.releaseAll();
- //Play Key is used for up key operation
- case -15811: Keyboard.press(KEY_UP_ARROW); //up key
- delay(100);
- Keyboard.releaseAll();
- break;
- }
- irrecv.resume(); // Receive the next value
- }
- }
注意:Keyboard.h库只支持基于32u4和SAMD的开发板(Leonardo、Esplora、Zero、Due和MKR系列)充当键盘。
以上就是本篇文章的全部内容。您可以尝试使用红外遥控器控制机器人。如有问题,请随时在本帖下面进行回复。 |  |手机版|YiBoard一板网
( 冀ICP备18020117号 )