|
想学习如何制作Launchpad控制的时钟?在本篇文章中,我们不止于此,会做得更多:这不仅是一个数字时钟,它还可以定期测量和显示房间的温度和相对湿度。本篇文章基于TI的LaunchPad开发板制作,并且使用Energia IDE开发环境编写软件代码。
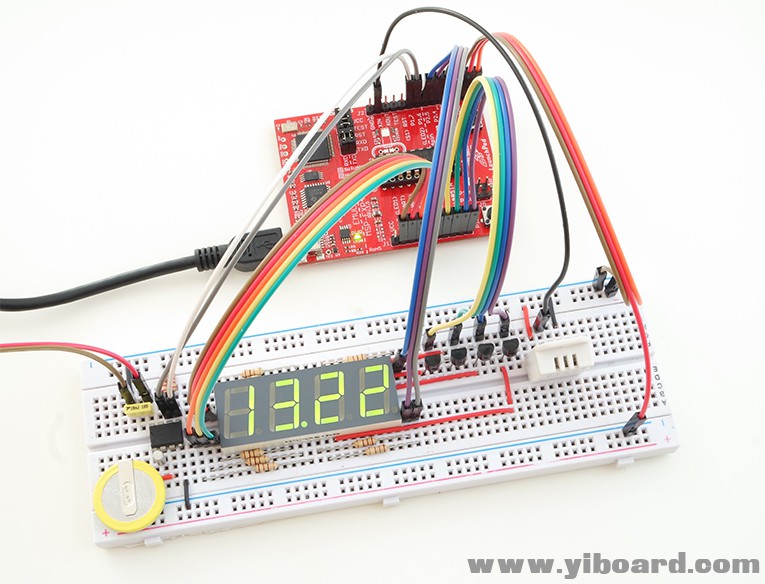
使用的材料 ● MSP430 LaunchPad开发板 ● 4位七段数码管 ● DHT22温度和湿度传感器 ● DS1307实时时钟 ● 32.768 kHz晶振 ● CR2025 3V电池 ● 连接导线和面包板
连接原理图
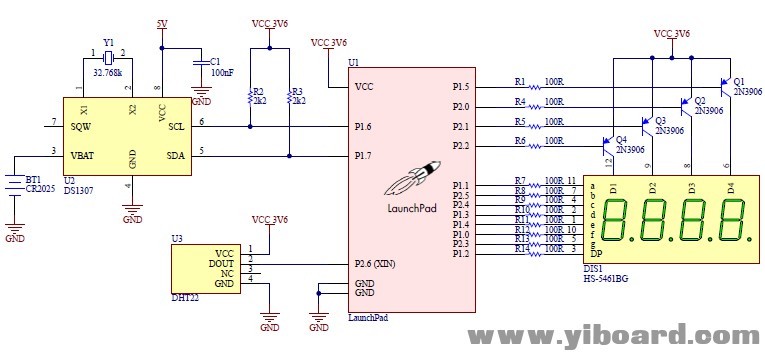
从原理图中可以看出,该电路有四个主要组件:LaunchPad、DS1307实时时钟、DHT22传感器和4位七段数码管。
DS1307是一款实时时钟IC,可通过I2C总线串行提供时间和日期信息。传输的数据包括小时、分钟、秒、年、月和日等信息。 DS1307需要一个频率为32.768 kHz的外部时钟,可由晶体振荡器提供。当IC的主电源被切断时,IC切换到后备电源模式并继续以微小电流模式工作。
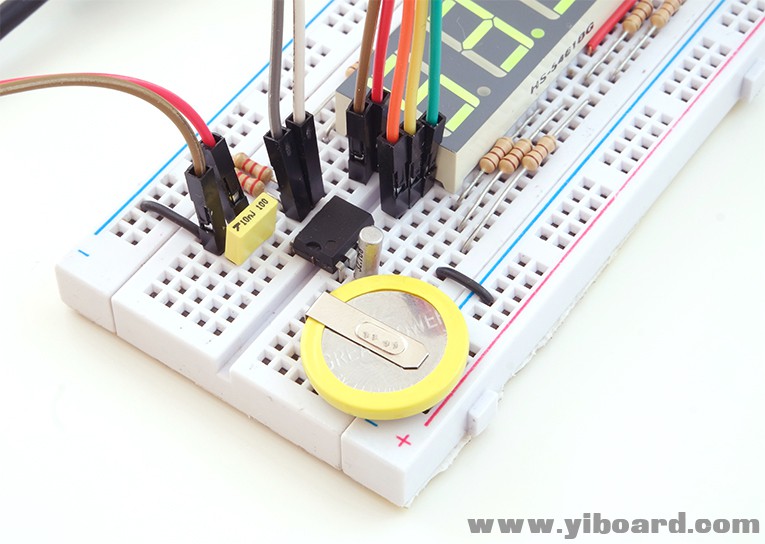
使用LaunchPad的内部I2C模块直接从DS1307读取时间信息。可以使用RTCLib库。 RTC和LaunchPad之间的连接通过SCL(P1.6)和SDA(P1.7)线完成,如原理图所示。这些连线通过2.2K的电阻R2和R3上拉至VCC,以保证正确的I2C操作。
DS1307需要5V电源电压。由于LaunchPad不提供5V输出,因此使用外部5V AC-DC适配器。 CR2025 3V电池连接到DS1307的VBAT引脚作为备用电源,可以使用几年。
在我们的应用程序中,我们没有外部控件来设置DS1307的日期和时间。要将当前日期和时间信息提供给DS1307,我们使用以下命令; - RTC.adjust(DateTime(__DATE__, __TIME__));
此命令将编程器计算机的当前日期和时间作为输入,并在上载Sketch后设置DS1307。它应在第一次上传后注释掉,并仅在需要新设置时使用。
电路的温度和湿度传感器是DHT22,也称为AM2302。 DHT22通过串行单数据总线进行通信。当微控制器发送起始位时,DHT22传输一个40位数据包,其中包括相对湿度和温度信息。在我们的应用程序中,我们使用适用于Energia的DHT22库从DHT22收集信息。
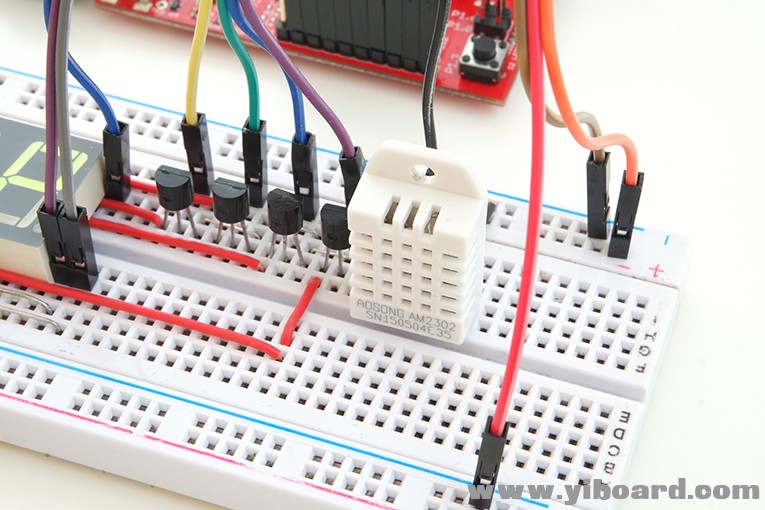
该电路的另一个主要部件是4位七段数码管。时间、温度和相对湿度信息显示在该数码管上。由于段线对于所有四个数字都是共用的,因此必须使用多路复用方法。在这种方法中,我们通过使用PNP晶体管2N3906作为开关一次仅导通一个数字。数字在3ms周期内依次打开和关闭。由于此动作足够快,人眼无法识别排序并看到所有四个数字都打开。为限制LED段电流,串联一只100欧电阻。
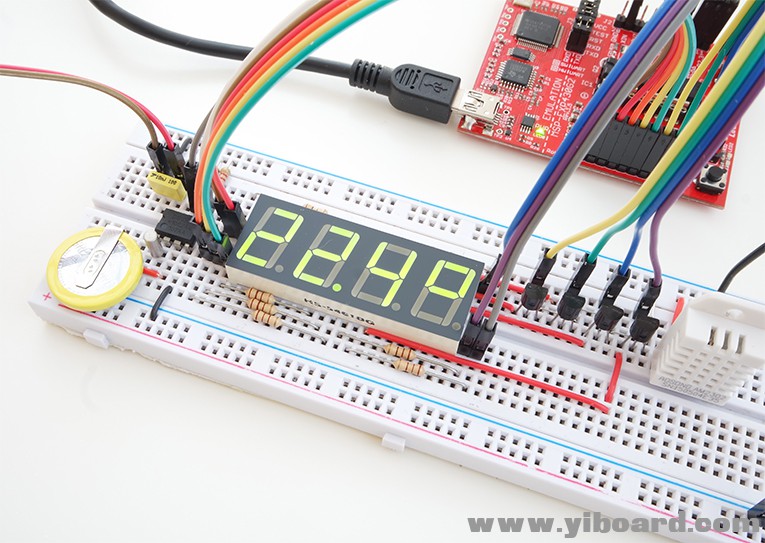
软件代码 该应用程序的软件内置于Energia IDE中,如下所示。该程序循环运行,包括以下操作; ● 初始化电路板 ● 从DS1307读取时间 ● 显示一段时间的时间 ● 读取相对湿度和温度数据 ● 显示温度一段时间 ● 显示相对湿度一段时间。
Energia IDE中的sketch详细阐述了每一步。请在帖子后面提出您遇到的问题。 - #include "Wire.h"
- #include "RTClib.h"
- #include "DHT22_430.h"
- #define DHTPIN P2_6
- RTC_DS1307 RTC;
- DHT22 mySensor(DHTPIN);
- unsigned long timestamp;
- unsigned int clockduration = 0;
- unsigned int tempduration = 0;
- unsigned int humduration = 0;
- // Seven Segment Display driver function
- void displaydigit (int value, int digit, boolean dot) {
-
- // Create each digit by turning on and off LED segments
- P1OUT |= 0b00011111;
- P2OUT |= 0b00111000;
- switch (value) {
- case 0:
- P1OUT &= 0b11100100; P2OUT &= 0b11001111; break;
- case 1:
- P1OUT &= 0b11111111; P2OUT &= 0b11001111; break;
- case 2:
- P1OUT &= 0b11100101; P2OUT &= 0b11010111; break;
- case 3:
- P1OUT &= 0b11110101; P2OUT &= 0b11000111; break;
- case 4:
- P1OUT &= 0b11111110; P2OUT &= 0b11000111; break;
- case 5:
- P1OUT &= 0b11110100; P2OUT &= 0b11100111; break;
- case 6:
- P1OUT &= 0b11100100; P2OUT &= 0b11100111; break;
- case 7:
- P1OUT &= 0b11111101; P2OUT &= 0b11001111; break;
- case 8:
- P1OUT &= 0b11100100; P2OUT &= 0b11000111; break;
- case 9:
- P1OUT &= 0b11110100; P2OUT &= 0b11000111; break;
- case 10:
- P1OUT &= 0b11111111; P2OUT &= 0b11111111; break;
- case 11:
- P1OUT &= 0b11111100; P2OUT &= 0b11010111; break;
- case 12:
- P1OUT &= 0b11101100; P2OUT &= 0b11010111; break;
- }
- // Turn on/off the dot LED
- if (dot) P1OUT &= 0b11111011;
- else P1OUT |= 0b00000100;
-
-
- // Turn on the selected digit
- digitalWrite(P1_5, HIGH);
- digitalWrite(P2_0, HIGH);
- digitalWrite(P2_1, HIGH);
- digitalWrite(P2_2, HIGH);
-
- switch (digit) {
- case 1:
- digitalWrite(P1_5, LOW); break;
- case 2:
- digitalWrite(P2_0, LOW); break;
- case 3:
- digitalWrite(P2_1, LOW); break;
- case 4:
- digitalWrite(P2_2, LOW); break;
- }
- }
- void setup()
- {
- // Set the port directions
- P1DIR |= 0b00111111;
- P2DIR |= 0b00111111;
- mySensor.begin();
- Wire.begin();
- RTC.begin();
-
- // Write the current date and time to DS1397
- RTC.adjust(DateTime(__DATE__, __TIME__));
- }
- void loop()
- {
-
- // Read and display the time
- while (clockduration <= 500) {
-
- timestamp = micros();
- DateTime now = RTC.now();
- while (timestamp + 3000 >= micros());
-
- if (now.hour()/10)
- displaydigit((now.hour()/10),1,0);
- else
- displaydigit(10,1,0);
- delay(3);
- if (now.second()%2)
- displaydigit((now.hour()),2,1);
- else
- displaydigit((now.hour()),2,0);
- delay(3);
- displaydigit((now.minute()/10),3,0);
- delay(3);
- displaydigit((now.minute()),4,0);
- clockduration++;
- }
-
- displaydigit(10,1,0);
- displaydigit(10,2,0);
- displaydigit(10,3,0);
- displaydigit(10,4,0);
- // Read and display the temperature and the relative humidity
- mySensor.get();
- int32_t h = mySensor.humidityX10();
- int32_t t = mySensor.temperatureX10();
- while (tempduration <= 300) {
- delay(3);
- displaydigit(t/100,1,0);
- delay(3);
- displaydigit((t/10),2,1);
- delay(3);
- displaydigit(t,3,0);
- delay(3);
- displaydigit(11,4,0);
- tempduration++;
- }
- while (humduration <= 300) {
- delay(3);
- displaydigit(h/100,1,0);
- delay(3);
- displaydigit((h/10),2,1);
- delay(3);
- displaydigit(h,3,0);
- delay(3);
- displaydigit(12,4,0);
- humduration++;
- }
-
- clockduration=0;
- tempduration=0;
- humduration=0;
- }
|
 |手机版|YiBoard一板网
( 冀ICP备18020117号 )