|
您对以太网通信感兴趣吗?在本篇帖子中,我们将使用ENC28J60模块和Arduino开发板探索以太网通信的世界。无论您是初学者还是经验丰富的Arduino爱好者,这都将对您有所帮助。在本文中,我们将学习如何连接ENC28J60模块,并提供分步说明和要点。通过简单的说明和实际示例,我们将学习如何建立TCP/IP 连接、发送和接收数据以及使用ENC28J60模块创建我们自己的Web服务器。
所需的组件 ● Arduino Micro开发板 ● ENC28J60以太网网络模块 ● 公/母跳线
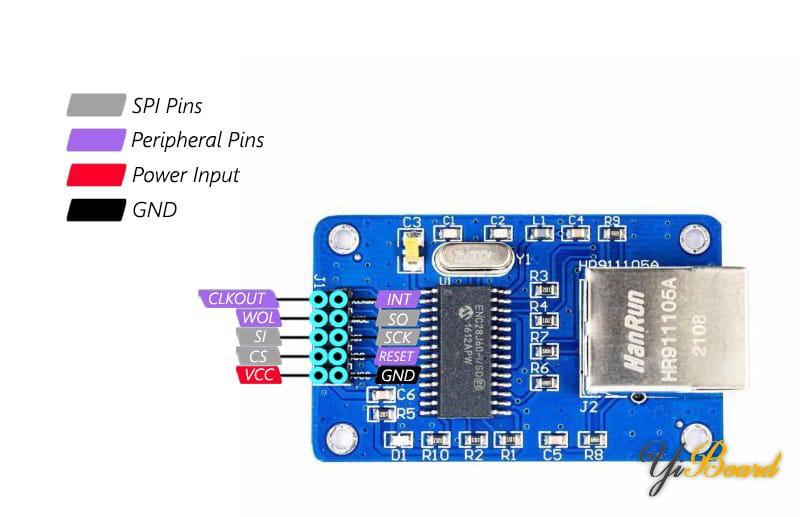
ENC28J60以太网模块的引脚排列 该模块配备ENC28J60 以太网网络控制器,支持各种网络协议。由于具有SPI接口,它可以轻松与微控制器通信。该芯片的最大数据传输速度为10Mbps,足以满足许多应用的需求。该模块有10个引脚,如下图所示。

使用Arduino和ENC28J60模块创建Web服务器的硬件连接
按如下所示连接各个组件,将Arduino开发板的SPI引脚连接到以太网模块的SPI引脚。 注意:ENC28J60以太网模块的电源电压必须为3.3V。更高的电压可能会烧毁芯片。

Web服务器代码 在开始编写代码之前,首先从此链接下载EthernetENC库并将其安装在Arduino软件中。 现在让我们开始编写Web服务器代码。通过此代码,Arduino读取6个模拟输入并以特定格式显示在Web服务器页面上。
- /*
- modified on OCT 23, 2023
- Modified by MajidMerati from Arduino Examples
- */
- #include <SPI.h>
- #include <EthernetENC.h>
- // Enter a MAC address and IP address for your controller below.
- // The IP address will be dependent on your local network:
- byte mac[] = {
- 0xDE, 0xAD, 0xBE, 0xEF, 0xFE, 0xED
- };
- IPAddress ip(192, 168, 6, 101);
- // Initialize the Ethernet server library
- // with the IP address and port you want to use
- // (port 80 is default for HTTP):
- EthernetServer server(80);
- void setup() {
- // You can use Ethernet.init(pin) to configure the CS pin
- //Ethernet.init(10); // Most Arduino shields
- //Ethernet.init(5); // MKR ETH shield
- //Ethernet.init(0); // Teensy 2.0
- //Ethernet.init(20); // Teensy++ 2.0
- //Ethernet.init(15); // ESP8266 with Adafruit Featherwing Ethernet
- //Ethernet.init(33); // ESP32 with Adafruit Featherwing Ethernet
- // Open serial communications and wait for port to open:
- Serial.begin(9600);
- while (!Serial) {
- ; // wait for serial port to connect. Needed for native USB port only
- }
- Serial.println("Ethernet WebServer Example");
- // start the Ethernet connection and the server:
- Ethernet.begin(mac, ip);
- // Check for Ethernet hardware present
- if (Ethernet.hardwareStatus() == EthernetNoHardware) {
- Serial.println("Ethernet shield was not found. Sorry, can't run without hardware. :(");
- while (true) {
- delay(1); // do nothing, no point running without Ethernet hardware
- }
- }
- if (Ethernet.linkStatus() == LinkOFF) {
- Serial.println("Ethernet cable is not connected.");
- }
- // start the server
- server.begin();
- Serial.print("server is at ");
- Serial.println(Ethernet.localIP());
- }
- void loop() {
- // listen for incoming clients
- EthernetClient client = server.available();
- if (client) {
- Serial.println("new client");
- // an http request ends with a blank line
- boolean currentLineIsBlank = true;
- while (client.connected()) {
- if (client.available()) {
- char c = client.read();
- Serial.write(c);
- // if you've gotten to the end of the line (received a new line
- // character) and the line is blank, the http request has ended,
- // so you can send a reply
- if (c == '\n' && currentLineIsBlank) {
- // send a standard http response header
- client.println("HTTP/1.1 200 OK");
- client.println("Content-Type: text/html");
- client.println("Connection: close"); // the connection will be closed after completion of the response
- client.println("Refresh: 5"); // refresh the page automatically every 5 sec
- client.println();
- client.println("<!DOCTYPE HTML>");
- client.println("<html>");
- // output the value of each analog input pin
- for (int analogChannel = 0; analogChannel < 6; analogChannel++) {
- int sensorReading = analogRead(analogChannel);
- client.print("analog input ");
- client.print(analogChannel);
- client.print(" is ");
- client.print(sensorReading);
- client.println("<br />");
- }
- client.println("</html>");
- break;
- }
- if (c == '\n') {
- // you're starting a new line
- currentLineIsBlank = true;
- } else if (c != '\r') {
- // you've gotten a character on the current line
- currentLineIsBlank = false;
- }
- }
- }
- // give the web browser time to receive the data
- delay(1);
- // close the connection:
- client.stop();
- Serial.println("client disconnected");
- }
- }
代码说明 在对Arduino开发板进行编程之前,请按照以下步骤操作: 1) 在第13行输入唯一的MAC地址。 2) 在第15行写入服务器的IP地址。 3) 在第20行输入所需的端口号。 4) 如果以太网模块的CS引脚连接到Arduino SS引脚以外的引脚,请在第24行更改引脚号。此外,如果使用Arduino以外的电路板,请从第25行到第29行选择适当的CS引脚号选项。 5) 在第85行到第89行,您可以更改Web服务器上显示的文本。
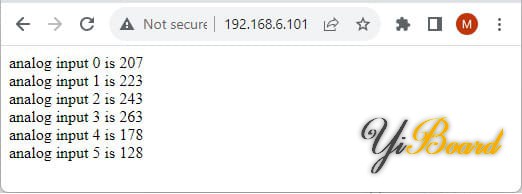
完成上述步骤后,上传代码。 几秒钟后,您的Web服务器将被激活。打开浏览器软件并在URL字段中输入服务器的IP地址。此代码的默认地址是192.168.6.101。这样做之后,您将看到以下窗口。

如您所见,此窗口显示了6个模拟通道的输入。
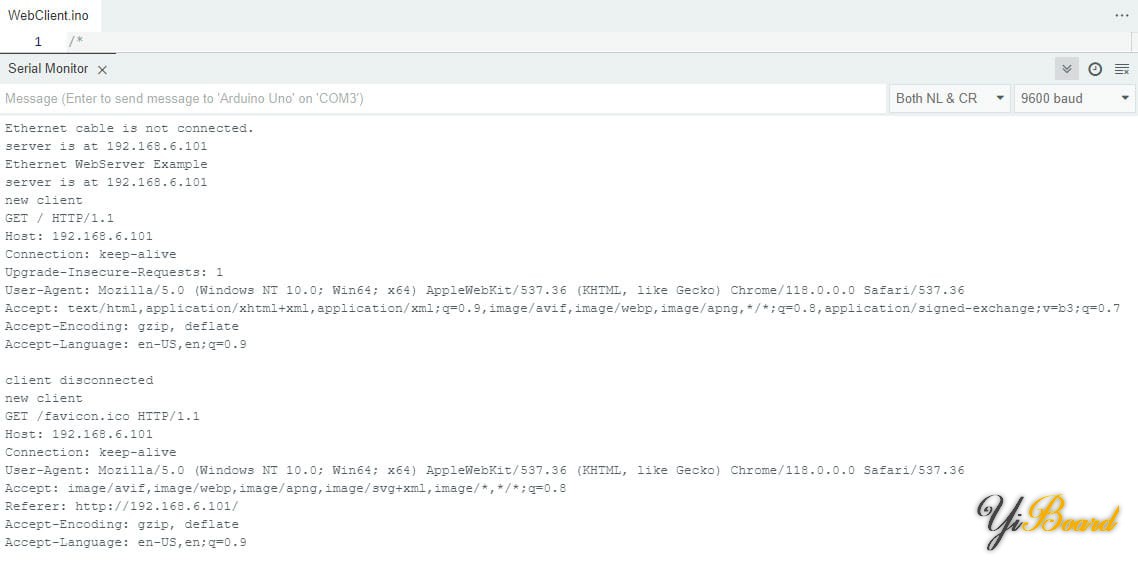
现在从Arduino软件打开串口监视器窗口。 如果所有电线和LAN电缆都正确连接并且您有正确的设置,将显示以下输出。

以上就是使用Arduino和ENC28J60以太网模块创建本地Web服务器的全部内容,如有任何问题,可以随时在本帖下面回复。
|  |手机版|YiBoard一板网
( 冀ICP备18020117号 )