|
在本篇文章中,我们将主要介绍如何通过红外线测量物体的表面温度。使用这项技术,我们可以简单地通过向物体表面发射红外波以及分析返回传感器的红外波来收集温度信息。

测量温度的传感器有许多不同的类型。 LM35或DS18B20温度传感器根据直接测量传感器设备表面产生的热量来提供输出信号。但是,对于高温的情况(例如明火),您无法使用基于接触的传感器来检测准确的温度。
如果您想以非接触方式检测温度,红外温度计传感器是最佳解决方案。因此,我们将使用Melexis的MLX90614红外测温传感器进行制作。 MLX90614传感器使用非接触式温度传感来收集温度信息,而不用接触物体的任何表面。
红外测温仪的工作原理 尽管人眼看不到红外光,但所有物体都发出红外光,浓度根据温度而变化。通过检测红外光,我们可以感知温度范围。 MLX90614温度计传感器使用此原理工作。
MLX90614是一款功能强大的红外传感器件,具有极低噪声放大器和17位ADC。它可以为温度计提供高精度和高分辨率。MLX90614的重要功能是出厂时已经进行了数字SMBus校准。这意味着它可以提供0.02°C的高分辨率输出,并可连续传输-20至120°C范围的测量温度。
现在在我们了解传感器的工作原理后,让我们来开始制作该测温计!
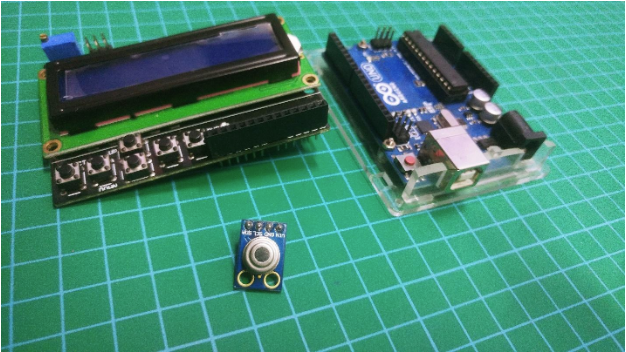
所需的材料 ● Arduino开发板 ● 字符型LCD1602 ● MLX90614传感器 ● LCD扩展板(可选)

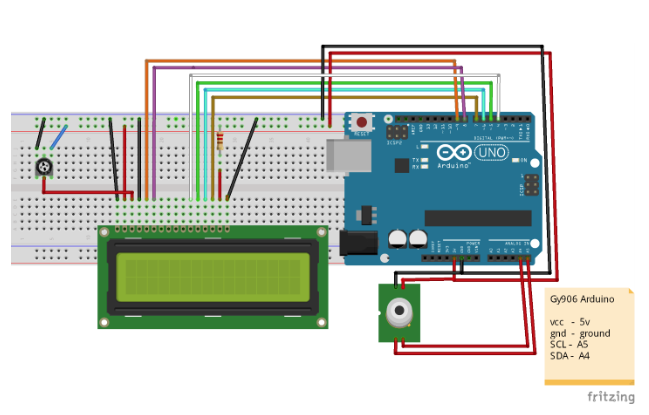
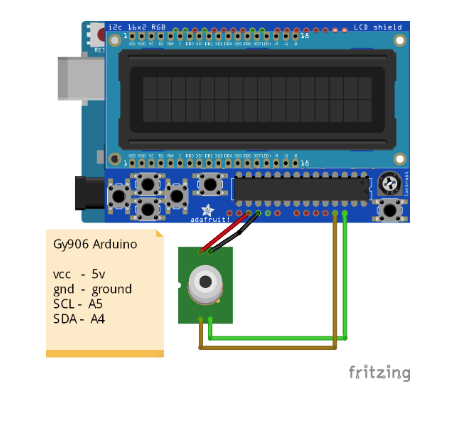
连接方式 MLX90614温度传感器使用I2C进行通信,因此我们可以直接将此传感器与Arduino连接,无需任何额外电路。如下图所示连接所有组件。您可以使用LCD 1602扩展板或连接一个单独的LCD,如Fritzing图中所述。

使用Arduino LCD Shield扩展板的连接方法:

上传代码 将以下源代码复制并粘贴到Arduino IDE中。仔细检查连接后,上传代码。 - /*
- * Non-contact Thermometer with GY - 906 module
- * Support for the MLX90614 sensor on the I2C bus
- * SDA line = A4
- * SCL line = A5
- * Sensor supply with 5V
- */
- #include <i2cmaster.h>
- #include <LiquidCrystal.h>
- LiquidCrystal lcd (8, 9, 4, 5, 6, 7);
- int address = 0xb4; // Sensor address MLX90614
- int erc = 0; // Variable holding the PEC value
- int dataH = 0; // The second byte of data
- int dataL = 0; // The first byte of data
- double tempnalsb = 0.02; // Variable by which the digital value will be multiplied
- double temperature = 0; // Variable holding the temperature
- void setup () {
- i2c_init (); // Initialization of the I2C bus
- lcd.begin (16, 2); // Initialize the display
- }
- void loop () {
-
- i2c_start_wait (address + I2C_WRITE); // Start I2C communication in write mode
- i2c_write (0x07); // Write the value 0x07 (select the register Tobj1)
- i2c_rep_start (address + I2C_READ); // Restart I2C communication at the read address
- dataL = i2c_readAck (); // Read the first byte of data
- dataH = i2c_readAck (); // Read the second byte of data
- erc = i2c_readNak (); // Read the third (unimportant) data byte
- i2c_stop (); // End of I2C transmission
-
-
- temperature = (double) (((dataH & 0x007F) << 8) + dataL); // Create a 16-bit variable consisting of two one-byte variables
- temperature = temperature * tempnalsb; // For one bit 0.02 K, the result of this operation is the temperature in Kelvin
-
- temperature = temperature - 273.15; // Conversion to Celsius degrees
-
- lcd.setCursor (0,0); // Display (first LCD line)
- lcd.print ("Object =");
- lcd.print (temperature);
- lcd.print ("");
- lcd.write (0xDF); // Degree sign
- lcd.print ("C");
-
- i2c_start_wait (address + I2C_WRITE);
- i2c_write (0x06); // Select the ambient temperature register
- i2c_rep_start (address + I2C_READ);
- dataL = i2c_readAck ();
- dataH = i2c_readAck ();
- erc = i2c_readNak ();
- i2c_stop ();
-
-
- temperature = (double) (((dataH & 0x007F) << 8) + dataL);
- temperature = temperature * tempnalsb;
- temperature = temperature - 273.15;
-
- lcd.setCursor(0,1); // Display (second LCD line)
- lcd.print ("Ambient =");
- lcd.print (temperature);
- lcd.print ("");
- lcd.write (0xDF);
- lcd.print ("C");
- delay (200); // Delay 200ms
- }
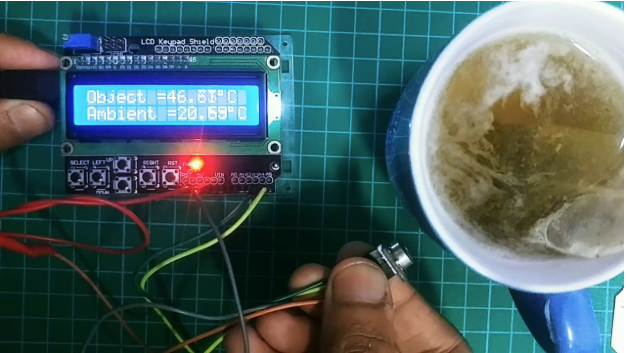
有许多项目可以使用红外温度传感器,例如测量液体表面。因为它不需要直接接触,所以MLX90614将是这些应用中的绝佳选择。 |  |手机版|YiBoard一板网
( 冀ICP备18020117号 )