|
在本篇文章中,您将了解称重传感器模块、其应用程序及其操作。此外,您将了解如何在Arduino中使用称重传感器模块。然后在了解了称重传感器的校准后,将制作一个可以测量重量的数字体重秤,精度为0.0001克,并且制作了一个测力计。
称重传感器基础知识 称重传感器是用于测量重量和力的电子传感器。当施加力时,其输出线上会出现毫伏级的弱电信号。事实上,称重传感器是一种将力转换为可测量的电输出的换能器。
称重传感器由金属芯和一组电阻组成,当施加力时,电阻会发生变形。但在移除力之后,它将返回其原始状态。这种材料的可逆性决定了称重传感器的质量和精度。称重传感器的等效电路如下:
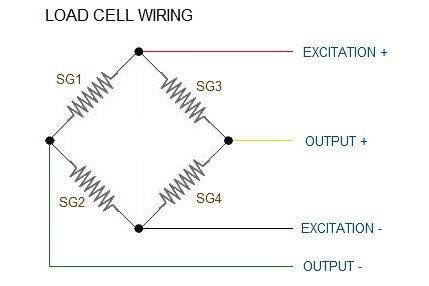
称重传感器有4根电线: ● 红色线表示激励+ ● 黑色线表示激励 - ● 白色线表示输出 - ● 绿色线表示输出+
所需的材料 ● Arduino UNO R3开发板 ● HX711秤重传感器 ● 1602串行LCD模块 ● Arduino IDE
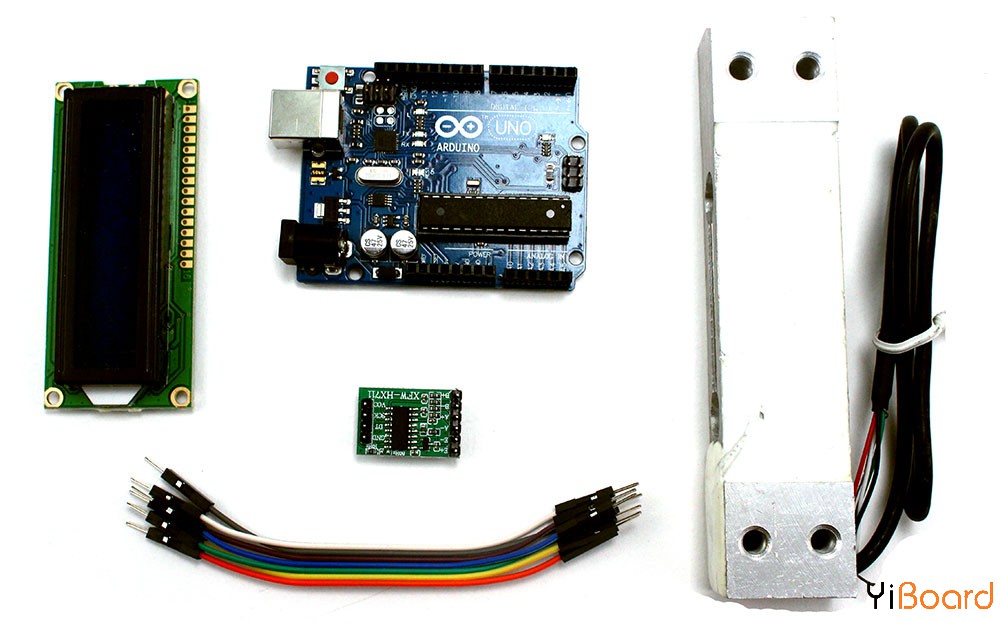
将称重传感器与Arduino连接 称重传感器产生的输出信号在毫伏范围内,因此我们需要一个放大器将信号转换为另一种电平信号,方便以后我们可以将其转换为数字信号并对其进行处理。为此,我们使用了HX711放大器传感器。 HX711放大器传感器包含一个HX711芯片,具有24位精度的模数转换功能。 HX711模块放大称重传感器的低压输出并将其发送到Arduino,以便Arduino最终根据该数据计算重量。
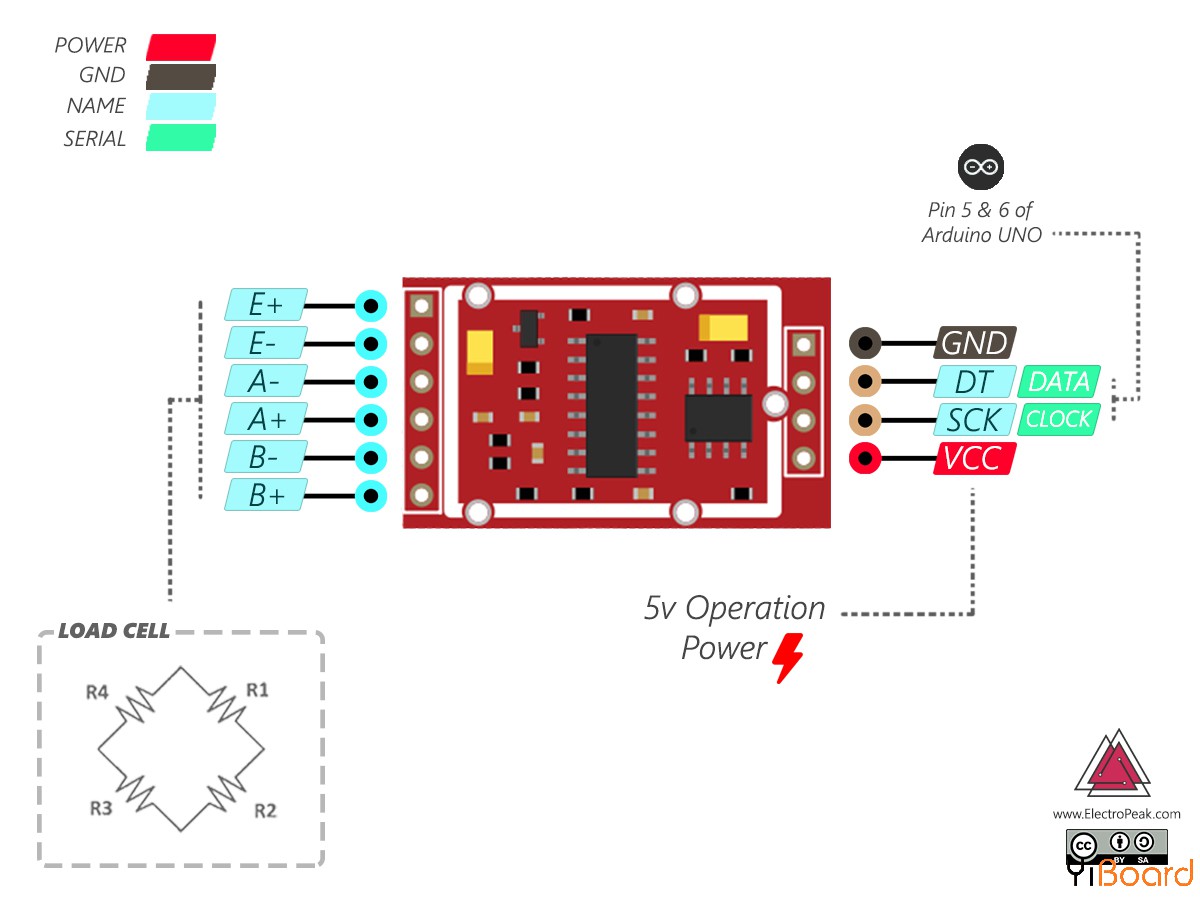
电路连接
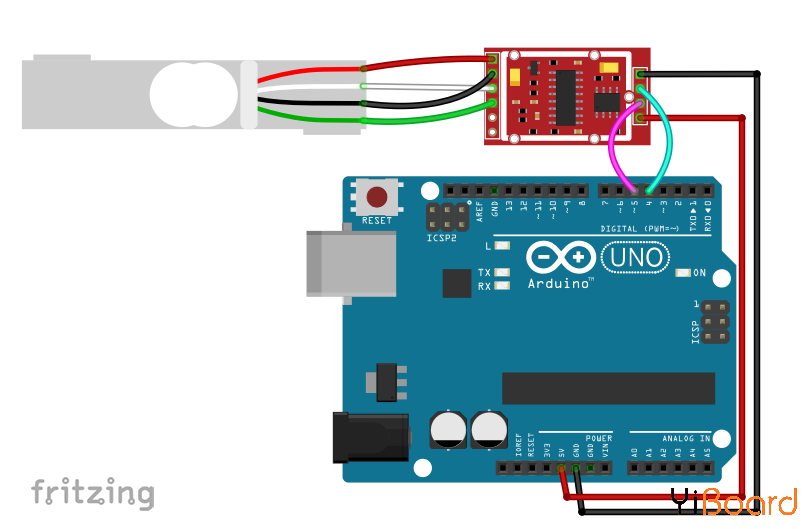
注意:当您对称重传感器进行称重时,请注意称重传感器的侧面。通常,模块上有一个箭头,显示力方向。借助此箭头,您可以正确放置重量和称重传感器。
称重传感器校准 要使用称重传感器,首先需要校准它。为此,请在Arduino开发板上上传以下代码。等到读取消息显示在串行监视器上,然后在称重传感器上放置指定的重量物体。使用A键,您可以将calibration_factor增加一个单位,您可以使用Z键减小它以获得正确的重量。
代码 本篇文章的代码使用的是HX711库: - /*
- * HX711 Calibration
- */
- /*
- Setup your scale and start the sketch WITHOUT a weight on the scale
- Once readings are displayed place the weight on the scale
- Press +/- or a/z to adjust the calibration_factor until the output readings match the known weight
- */
- #include "HX711.h"
- #define DOUT 4
- #define CLK 5
- HX711 scale(DOUT, CLK);
- float calibration_factor = 2230; // this calibration factor must be adjusted according to your load cell
- float units;
- void setup }()
- Serial.begin(9600);
- Serial.println("HX711 calibration sketch");
- Serial.println("Remove all weight from scale");
- Serial.println("After readings begin, place known weight on scale");
- Serial.println("Press + or a to increase calibration factor");
- Serial.println("Press - or z to decrease calibration factor");
- scale.set_scale(calibration_factor); //Adjust to this calibration factor
- scale.tare(); //Reset the scale to 0
- long zero_factor = scale.read_average(); //Get a baseline reading
- Serial.print("Zero factor: "); //This can be used to remove the need to tare the scale. Useful in permanent scale projects.
- Serial.println(zero_factor);
- {
set_scale();函数将用于刻度校准的calibration_factor设置为所需的值,tare(); 函数将其设置归零。 get_units(); 函数读取重量,如果小于零,则认为是零。
测量物体的重量 电路连接
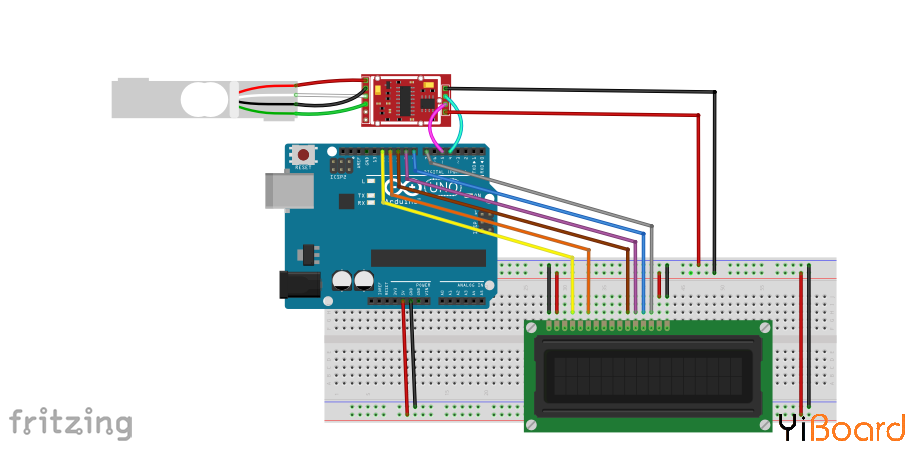
代码 - /*
- * Digital Weighing Scale with Load Cell
- * by Hanie kiani
- * https://electropeak.com/learn/
- */
- #include "HX711.h" //You must have this library in your arduino library folder
- #include <LiquidCrystal.h>
- LiquidCrystal lcd(12, 11, 10, 9, 8, 7);
- #define DOUT 4
- #define CLK 5
-
- HX711 scale(DOUT, CLK);
-
- float calibration_factor = 2230; // this calibration factor is adjusted according to my load cell
- float units;
-
- void setup() {
- lcd.begin(16,2);
- Serial.begin(9600);
- Serial.println("Press T to tare");
- scale.set_scale(calibration_factor); //Adjust to this calibration factor
- scale.tare();
- }
- void loop() {
-
- units = scale.get_units(), 5;
- if (units < 0)
- {
- units = 0.00;
- }
- lcd.setCursor(0,0);
- lcd.print("Weight: ");
- lcd.setCursor(8,0);
- lcd.print(units,5); //displays the weight in 4 decimal places only for calibration
- lcd.setCursor(14,0);
- lcd.print("grams");
- if(Serial.available())
- {
- char temp = Serial.read();
- if(temp == 't' || temp == 'T')
- scale.tare(); //Reset the scale to zero
- }
- }
制作一个测力计 您也可以使用称重传感器模块测量以牛顿为单位的力。为此,您可以在开发板上应用适当的calibration_factor后上传以下代码,并通过对称重传感器施加不同的力来查看结果。
将称重传感器放在平坦的表面上。 然后用手向传感器施加一个力。 您可以看到当您施加更大的力时,LCD上会显示更大的数字。
代码 - /*
- * Digital Force Gauge with Loa d Cell
- * by Hanie kiani
- * https://electropeak.com/learn/
- */
- #include "HX711.h" //You must have this library in your arduino library folder
- #include <LiquidCrystal.h>
- LiquidCrystal lcd(12, 11, 10, 9, 8, 7);
- #define DOUT 4
- #define CLK 5
- HX711 scale(DOUT, CLK);
-
- float calibration_factor = 1; // this calibration factor is adjusted according to my load cell
- float units;
-
- void setup() {
- lcd.begin(16,2);
- Serial.begin(9600);
- Serial.println("Press T to tare");
- scale.set_scale(calibration_factor); //Adjust to this calibration factor
- scale.tare();
- }
-
- void loop() {
-
- units = scale.get_units(), 5;
- if (units < 0)
- {
- units = 0.00;
- }
- lcd.setCursor(0,0);
- lcd.print("Force: ");
- Serial.print("Force: ");
- lcd.setCursor(8,0);
- lcd.print(units,5); //displays the weight in 4 decimal places only for calibration
- Serial.print(units,5);
- lcd.setCursor(14,0);
- lcd.print("N");
- Serial.print("N ");
- Serial.println();
- delay(2000);
-
-
- if(Serial.available())
- {
- char temp = Serial.read();
- if(temp == 't' || temp == 'T')
- scale.tare(); //Reset the scale to zero
- }
- }
以上就是本篇文章的全部内容。接下来,您可以做更多的尝试,例如通过在电路中添加电位器和旋转编码器,使用户可以更改测量单位。如果遇到问题,请随时在本帖下面进行回复。 |  |手机版|YiBoard一板网
( 冀ICP备18020117号 )